
OK, some of my pictures are not optimal, but in the interest of getting some things out there for those waiting or considering purchasing this model, here we go…
This gives you an idea of the size – it is not as deep as it is wide or tall – neatly sitting on a conventional computer desk. The lighting is bright as you can see, and the color touch screen control panel and power button are all the controls for the entire machine. Yet it has a larger build volume than the Cube 1 and 2 units at 6″ in x, y and z.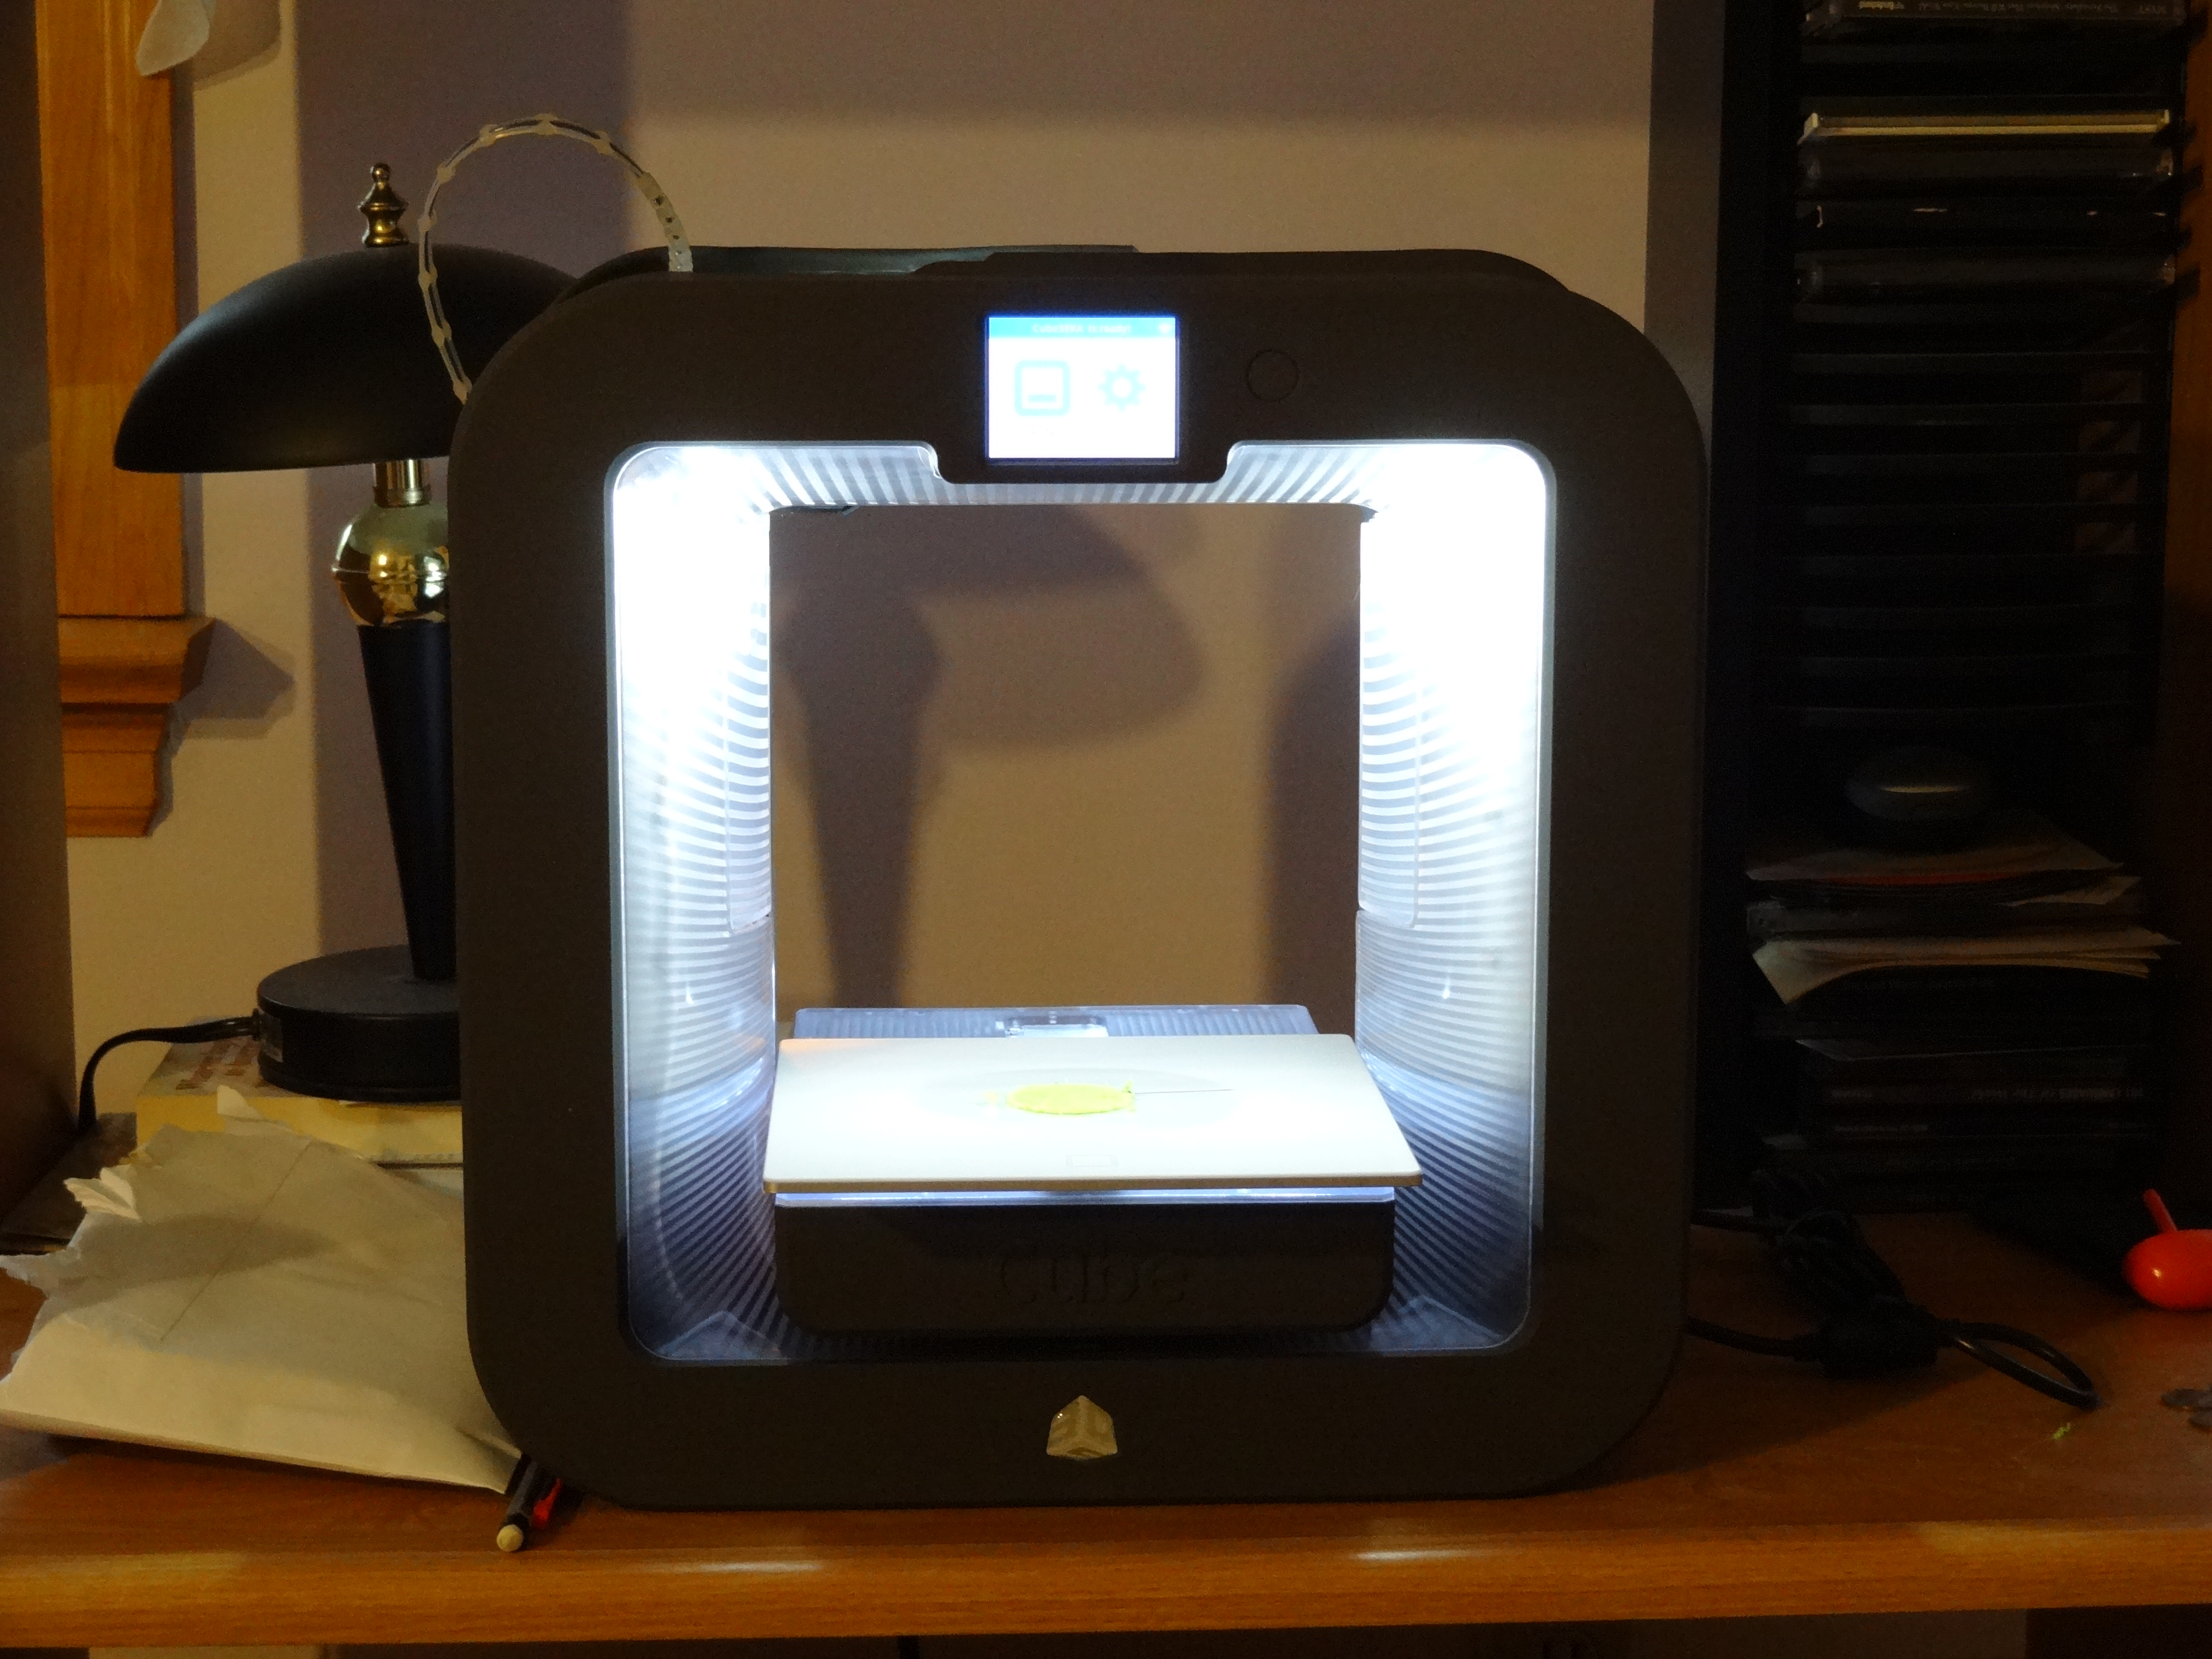
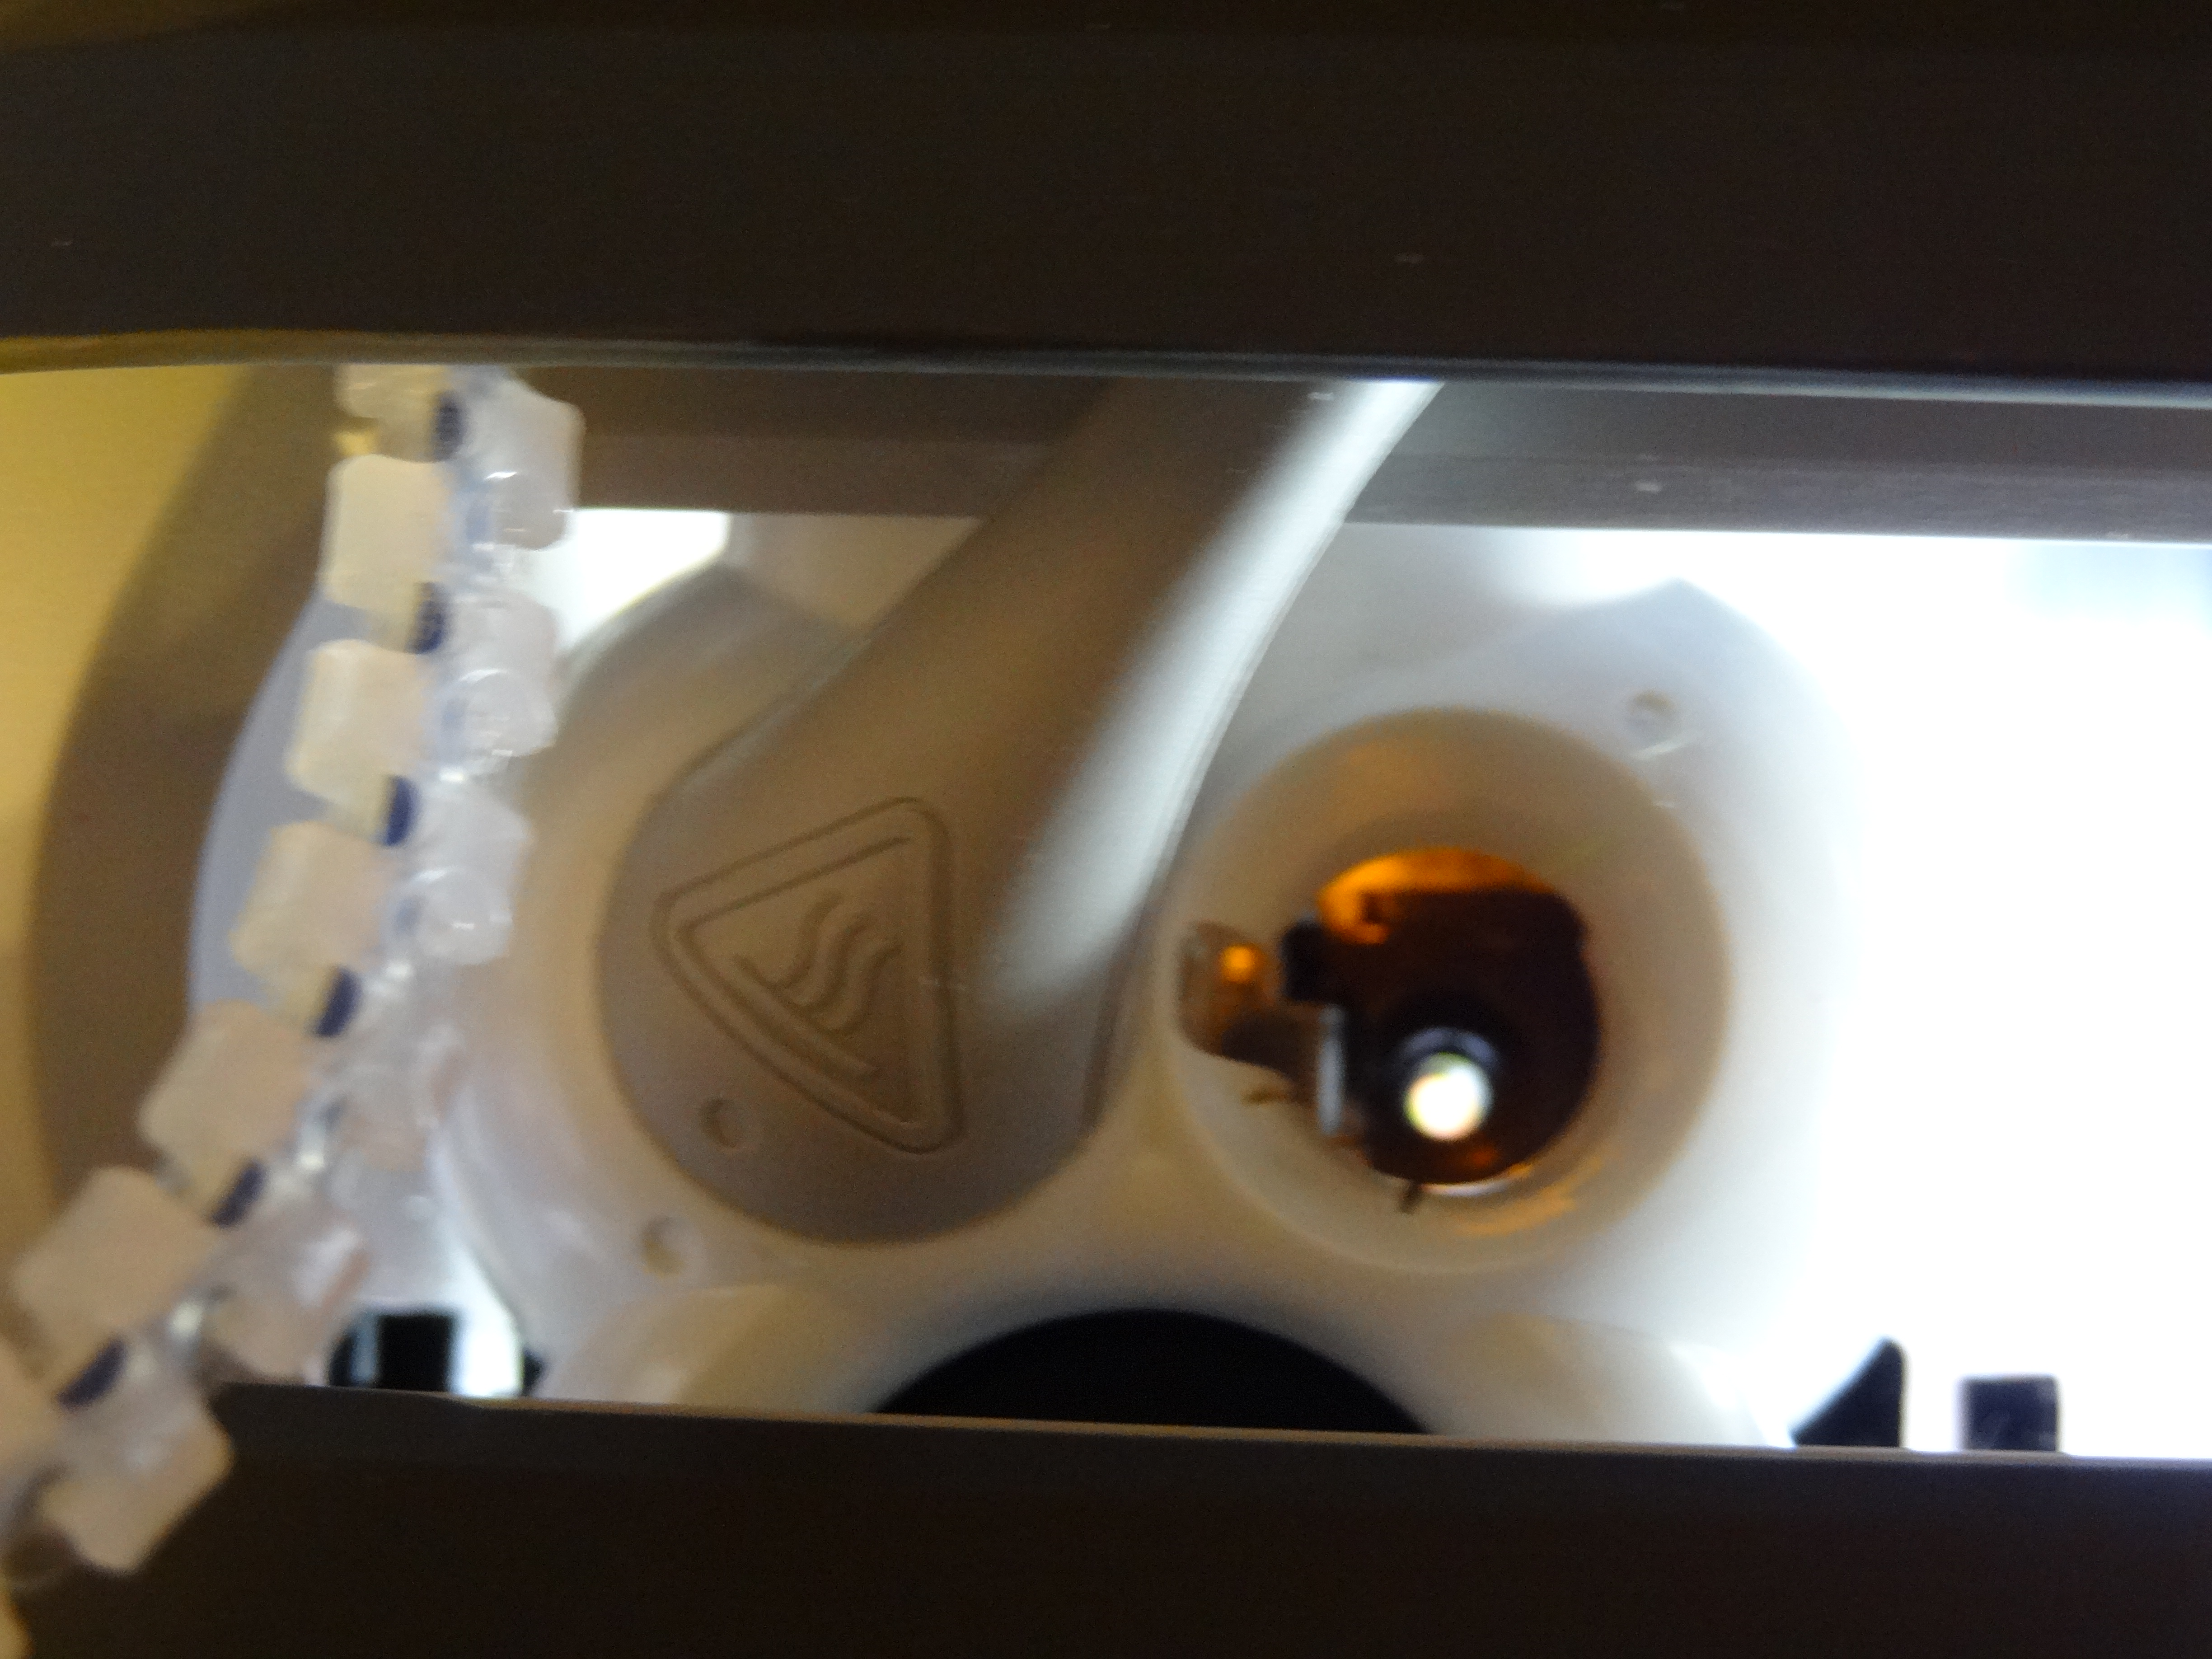
Cartridges mount on the sides of the unit. They snap in to the base and the nozzle locks into the head with a 60 degree spin. You can see the drive pin in the very center of the cartridge tray, and the socket on the cartridge itself. 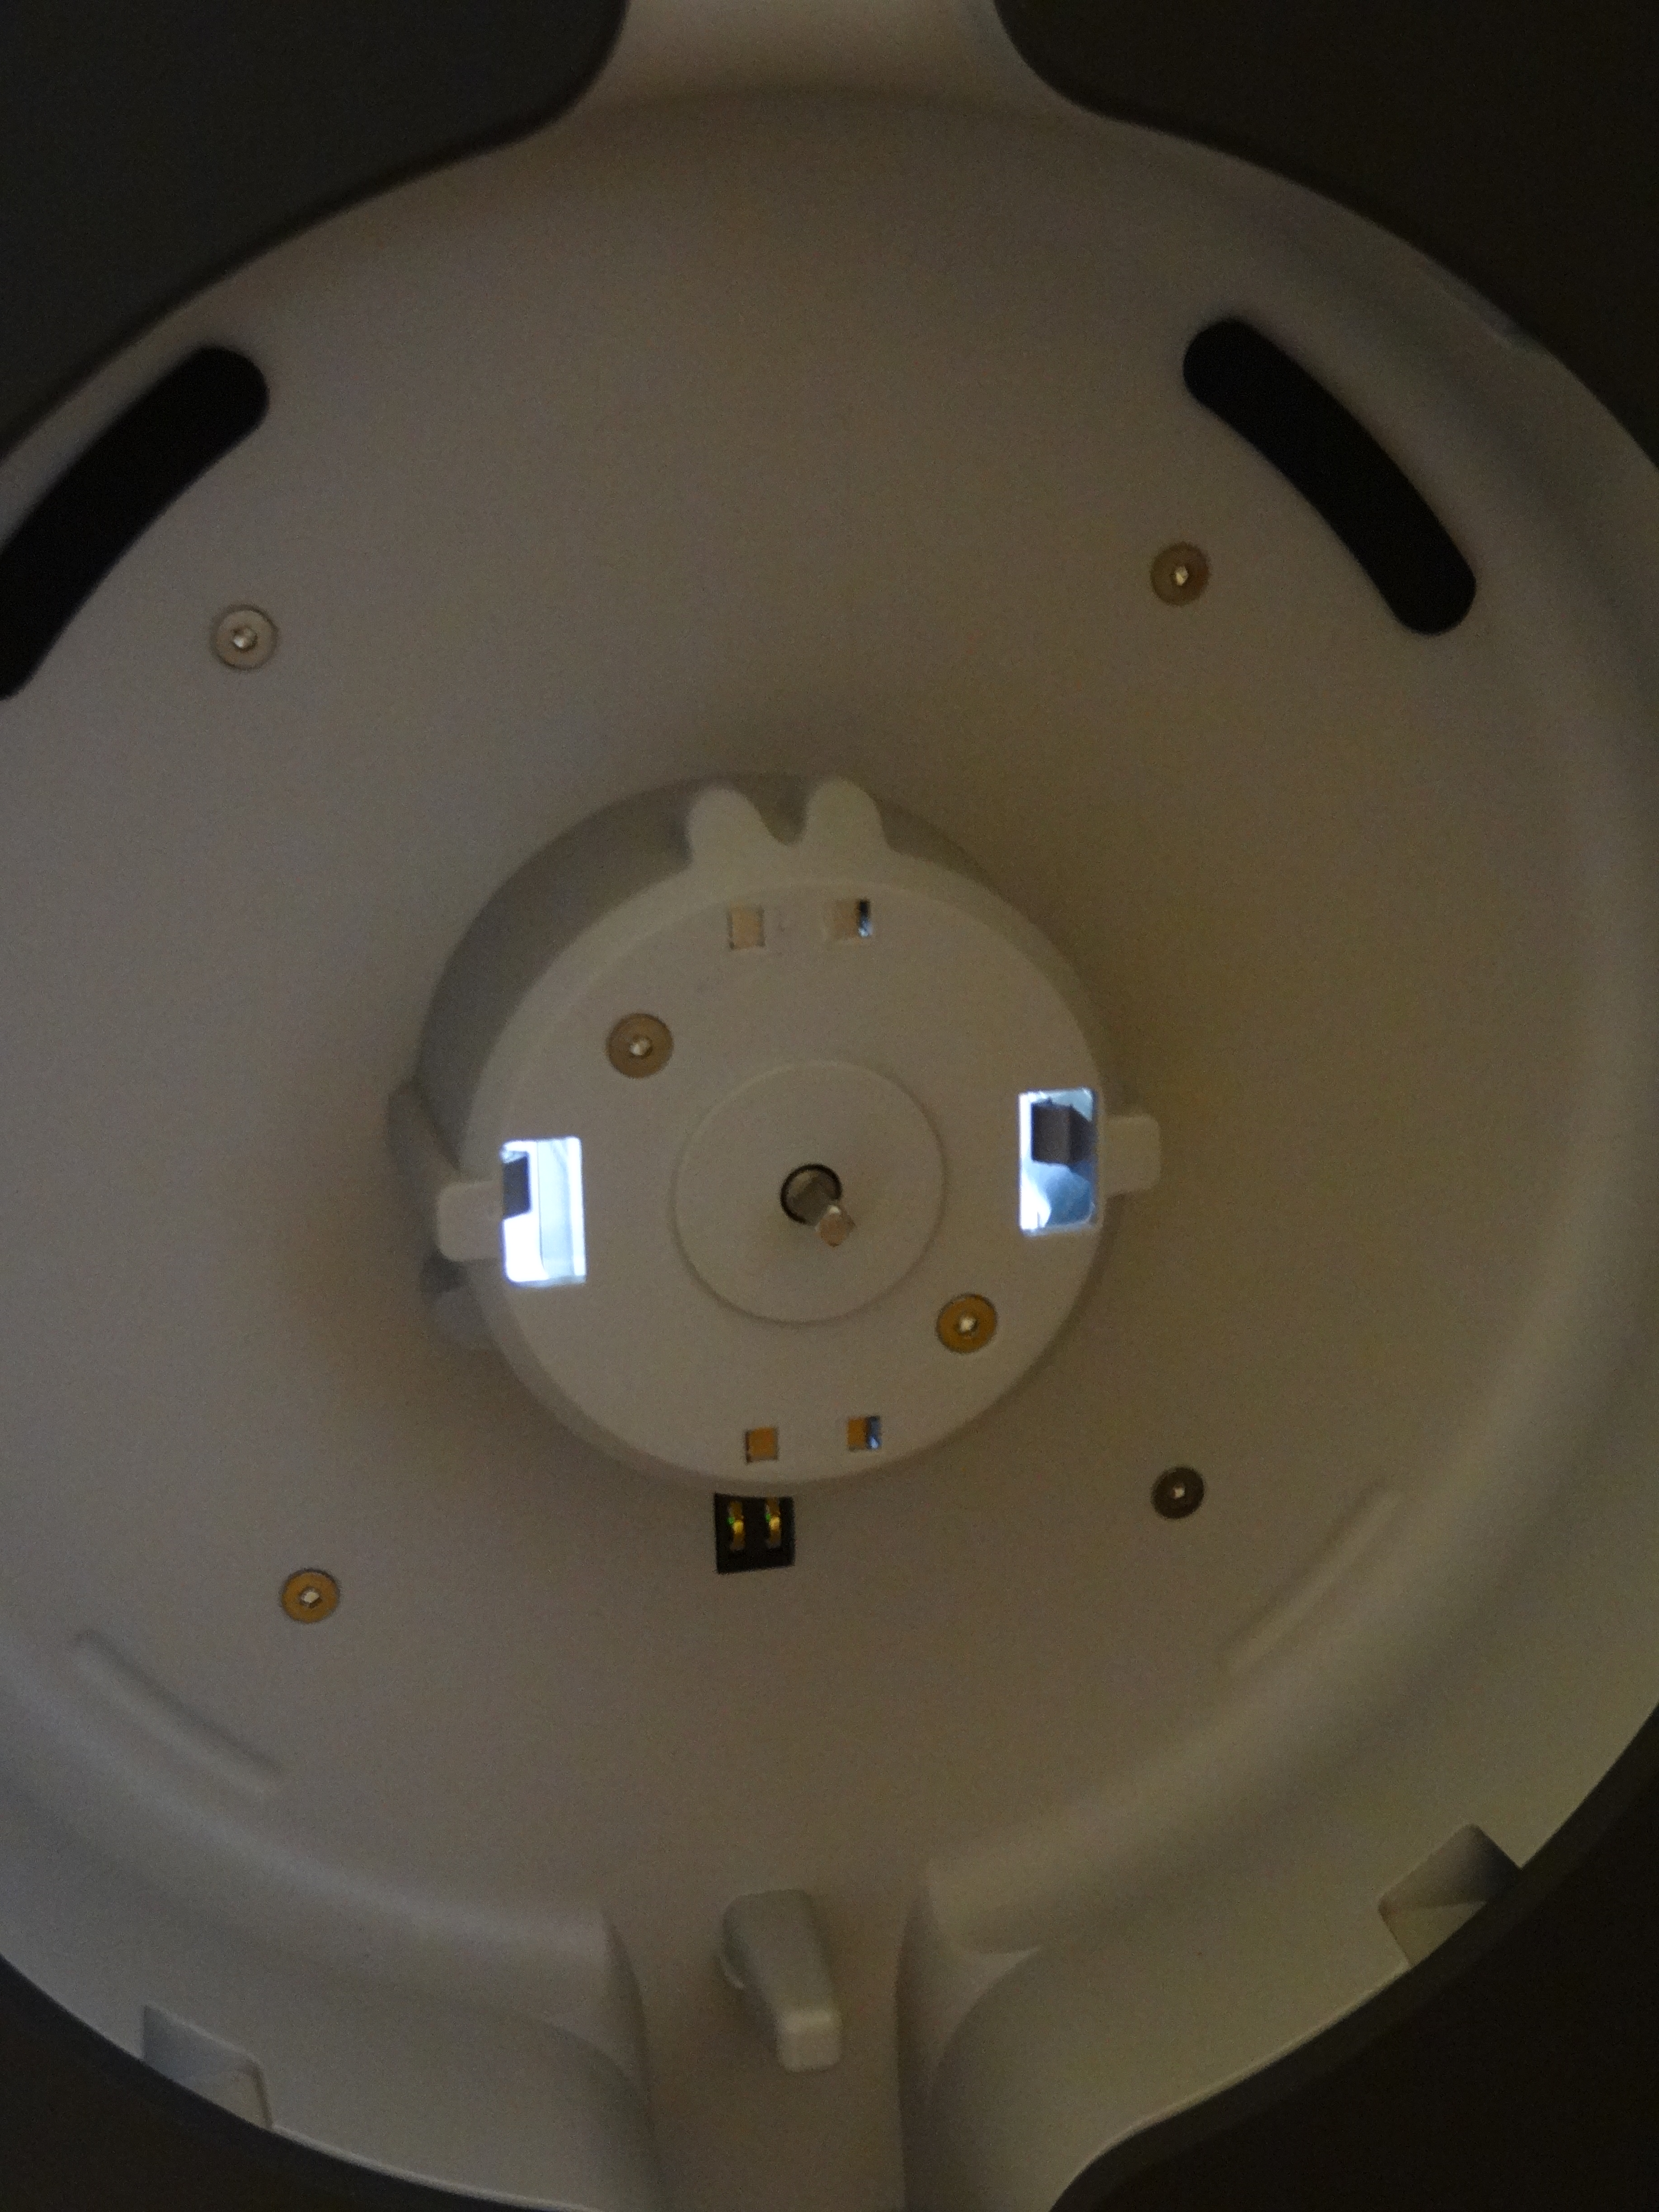 As far as I know, this is the first use of a
 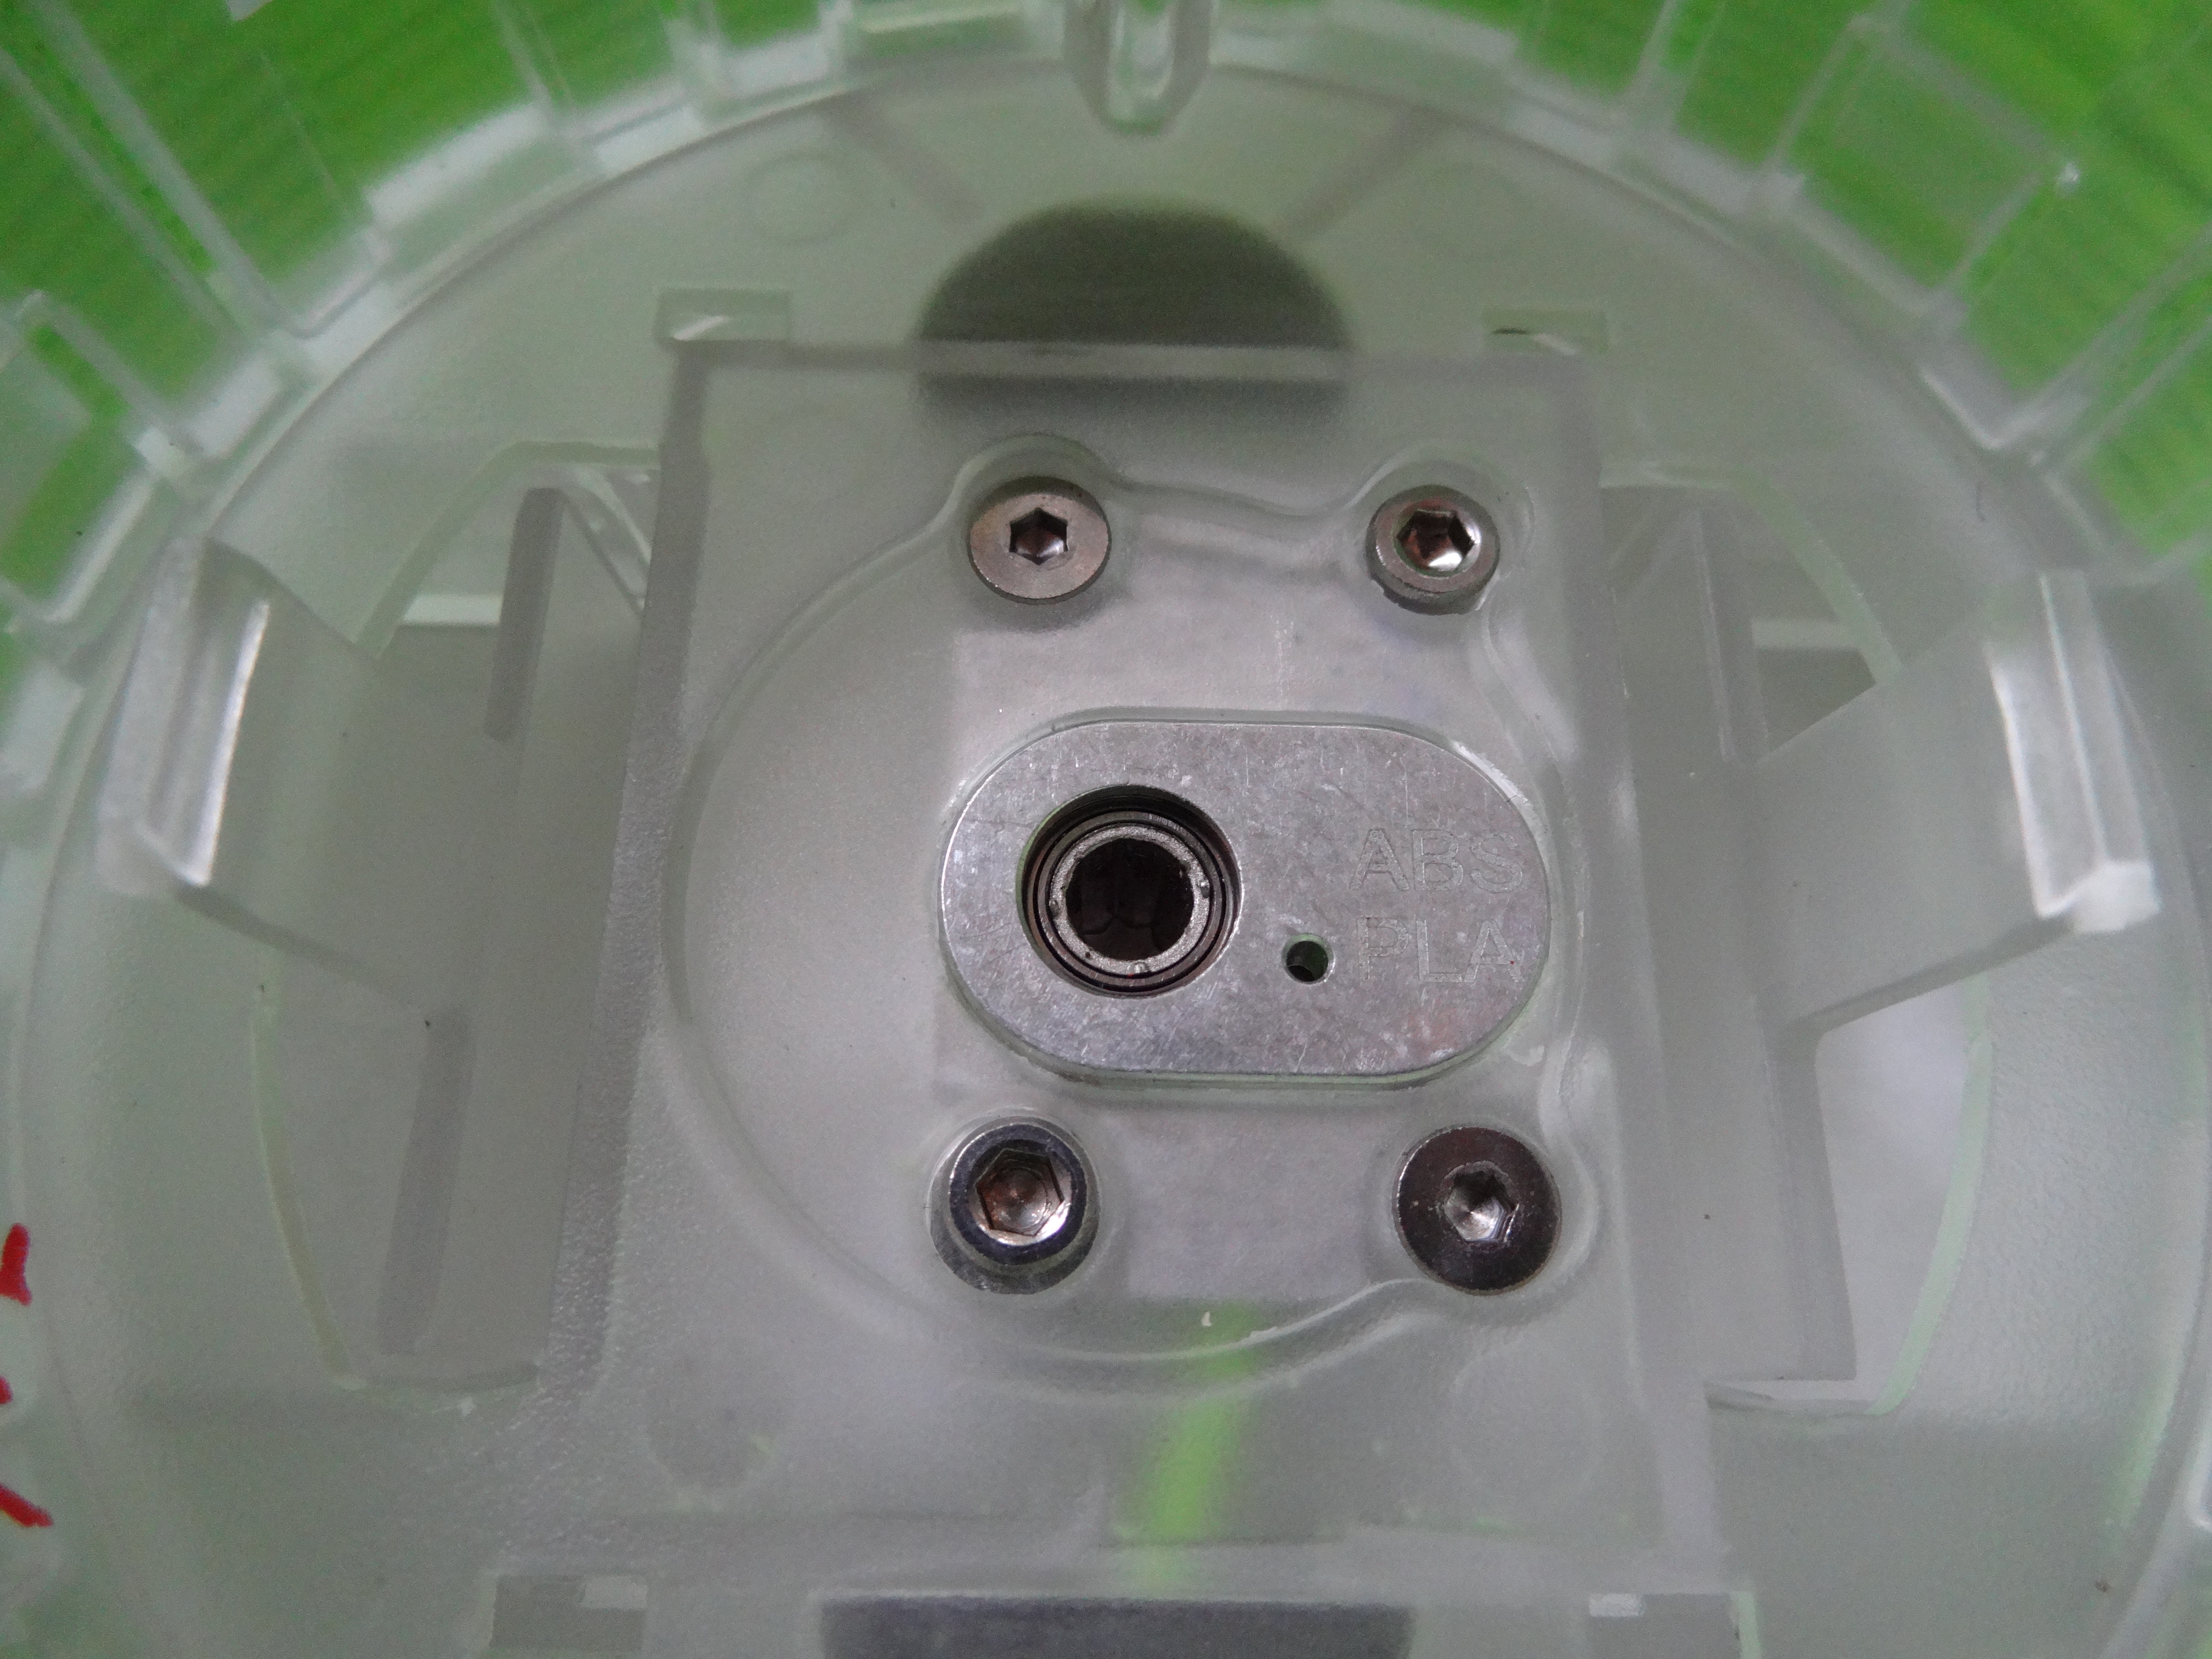 remote extruder drive in a consumer 3D printer (the Stratasys Mojo was the first I think on the commercial side). This design feeds and forces the filament up from the cartridge to the head – there is no motor or other drive at the nozzle end. While the pathway is short and the tube sealed, this design has some potential issues – but on the plus side you get a new extruder drive and nozzle with each cartridge.
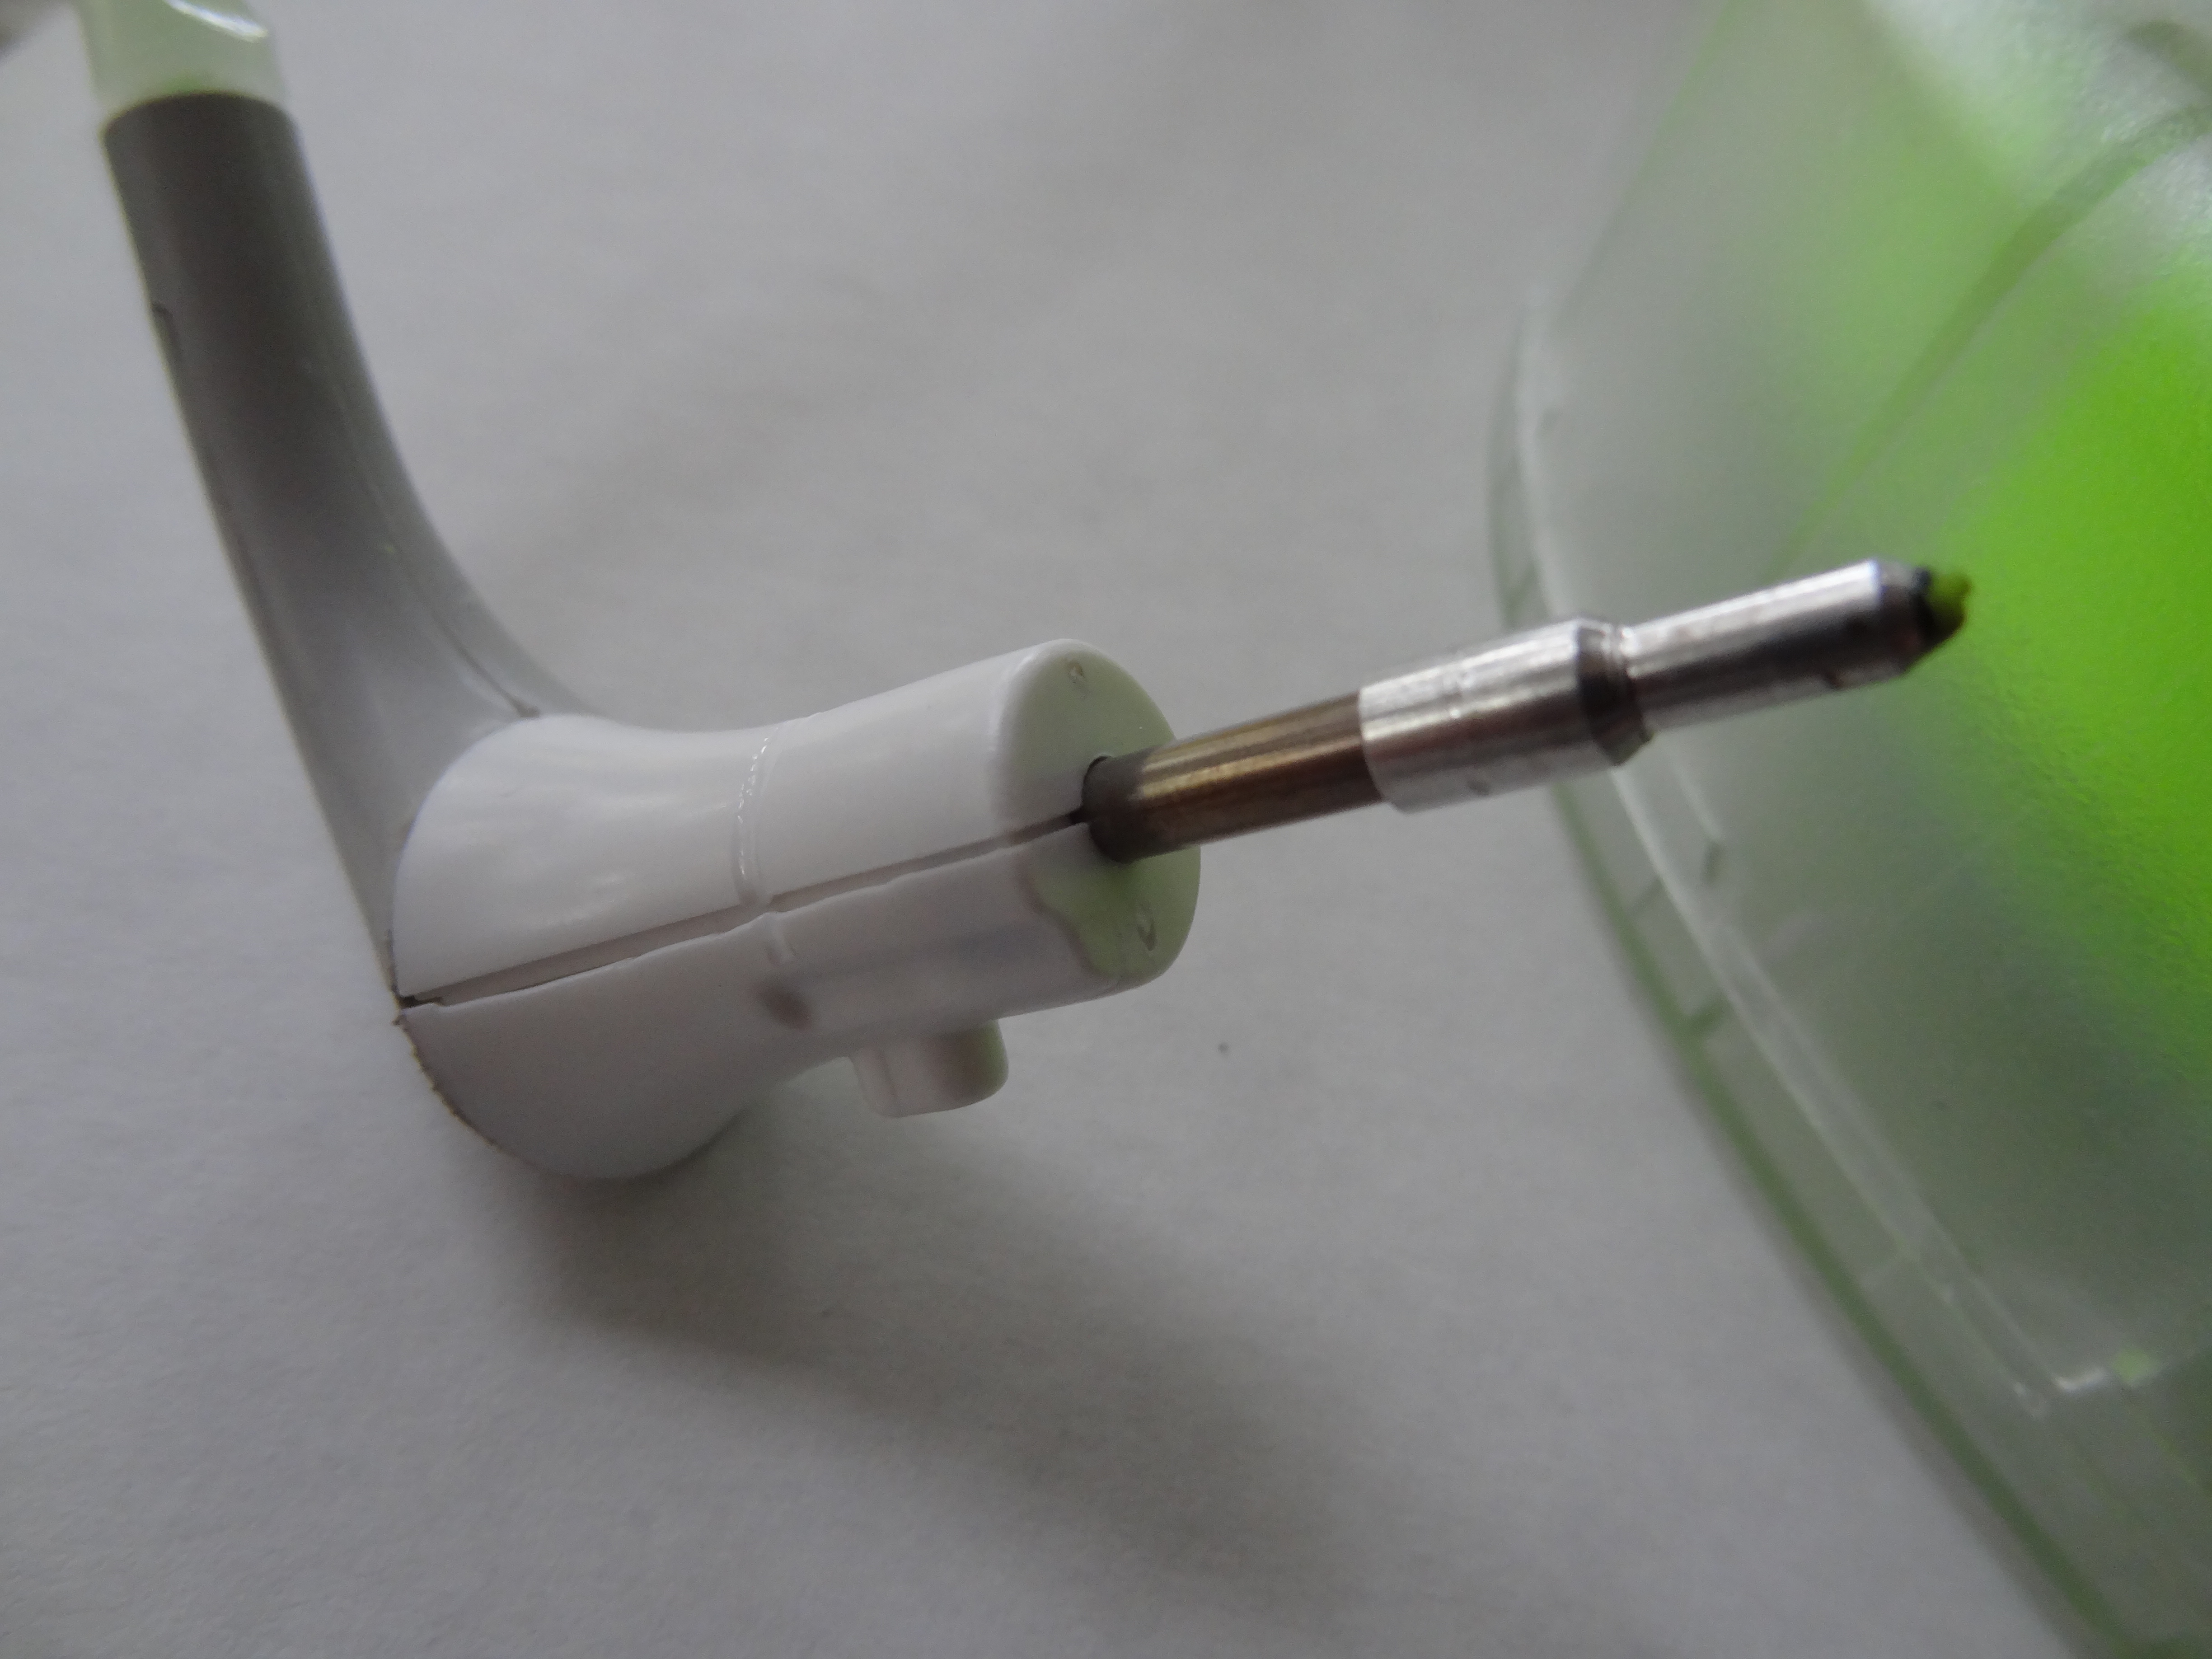
The motor for the filament drive is inside the Cube. In the Cube 1 and 2 units, the head itself had the drive motor inside, and the filament was drawn from the cartridge. Yes, these cartridges, like the Cube 1 and 2, are chipped and proprietary, but unlike the opaque shells used earlier, the frosted clear plastic allows a quick visual on the remaining filament. But I believe they contain as much or more filament than the old cartridges – approximately 500g is on the spool. And despite what must be a higher cost per cartridge shell, the price is the same as before.
Setup was quick and easy. The touch screen leads you through with visuals and text to let you know what is next. The demo build is a small keychain fob and a cursive “Hi!” printed below it. So after getting things connected, I went on to do some builds of my own.
The one I really wanted to try was the dual color faceted vase that is an included sample. So I took the plunge and set it up for green on the main part and black on the round side features (in my unit, the starter cartridges were neon green and black PLA). As I made it full size, the total estimated build time came to 36 hours at 70 micron layers. 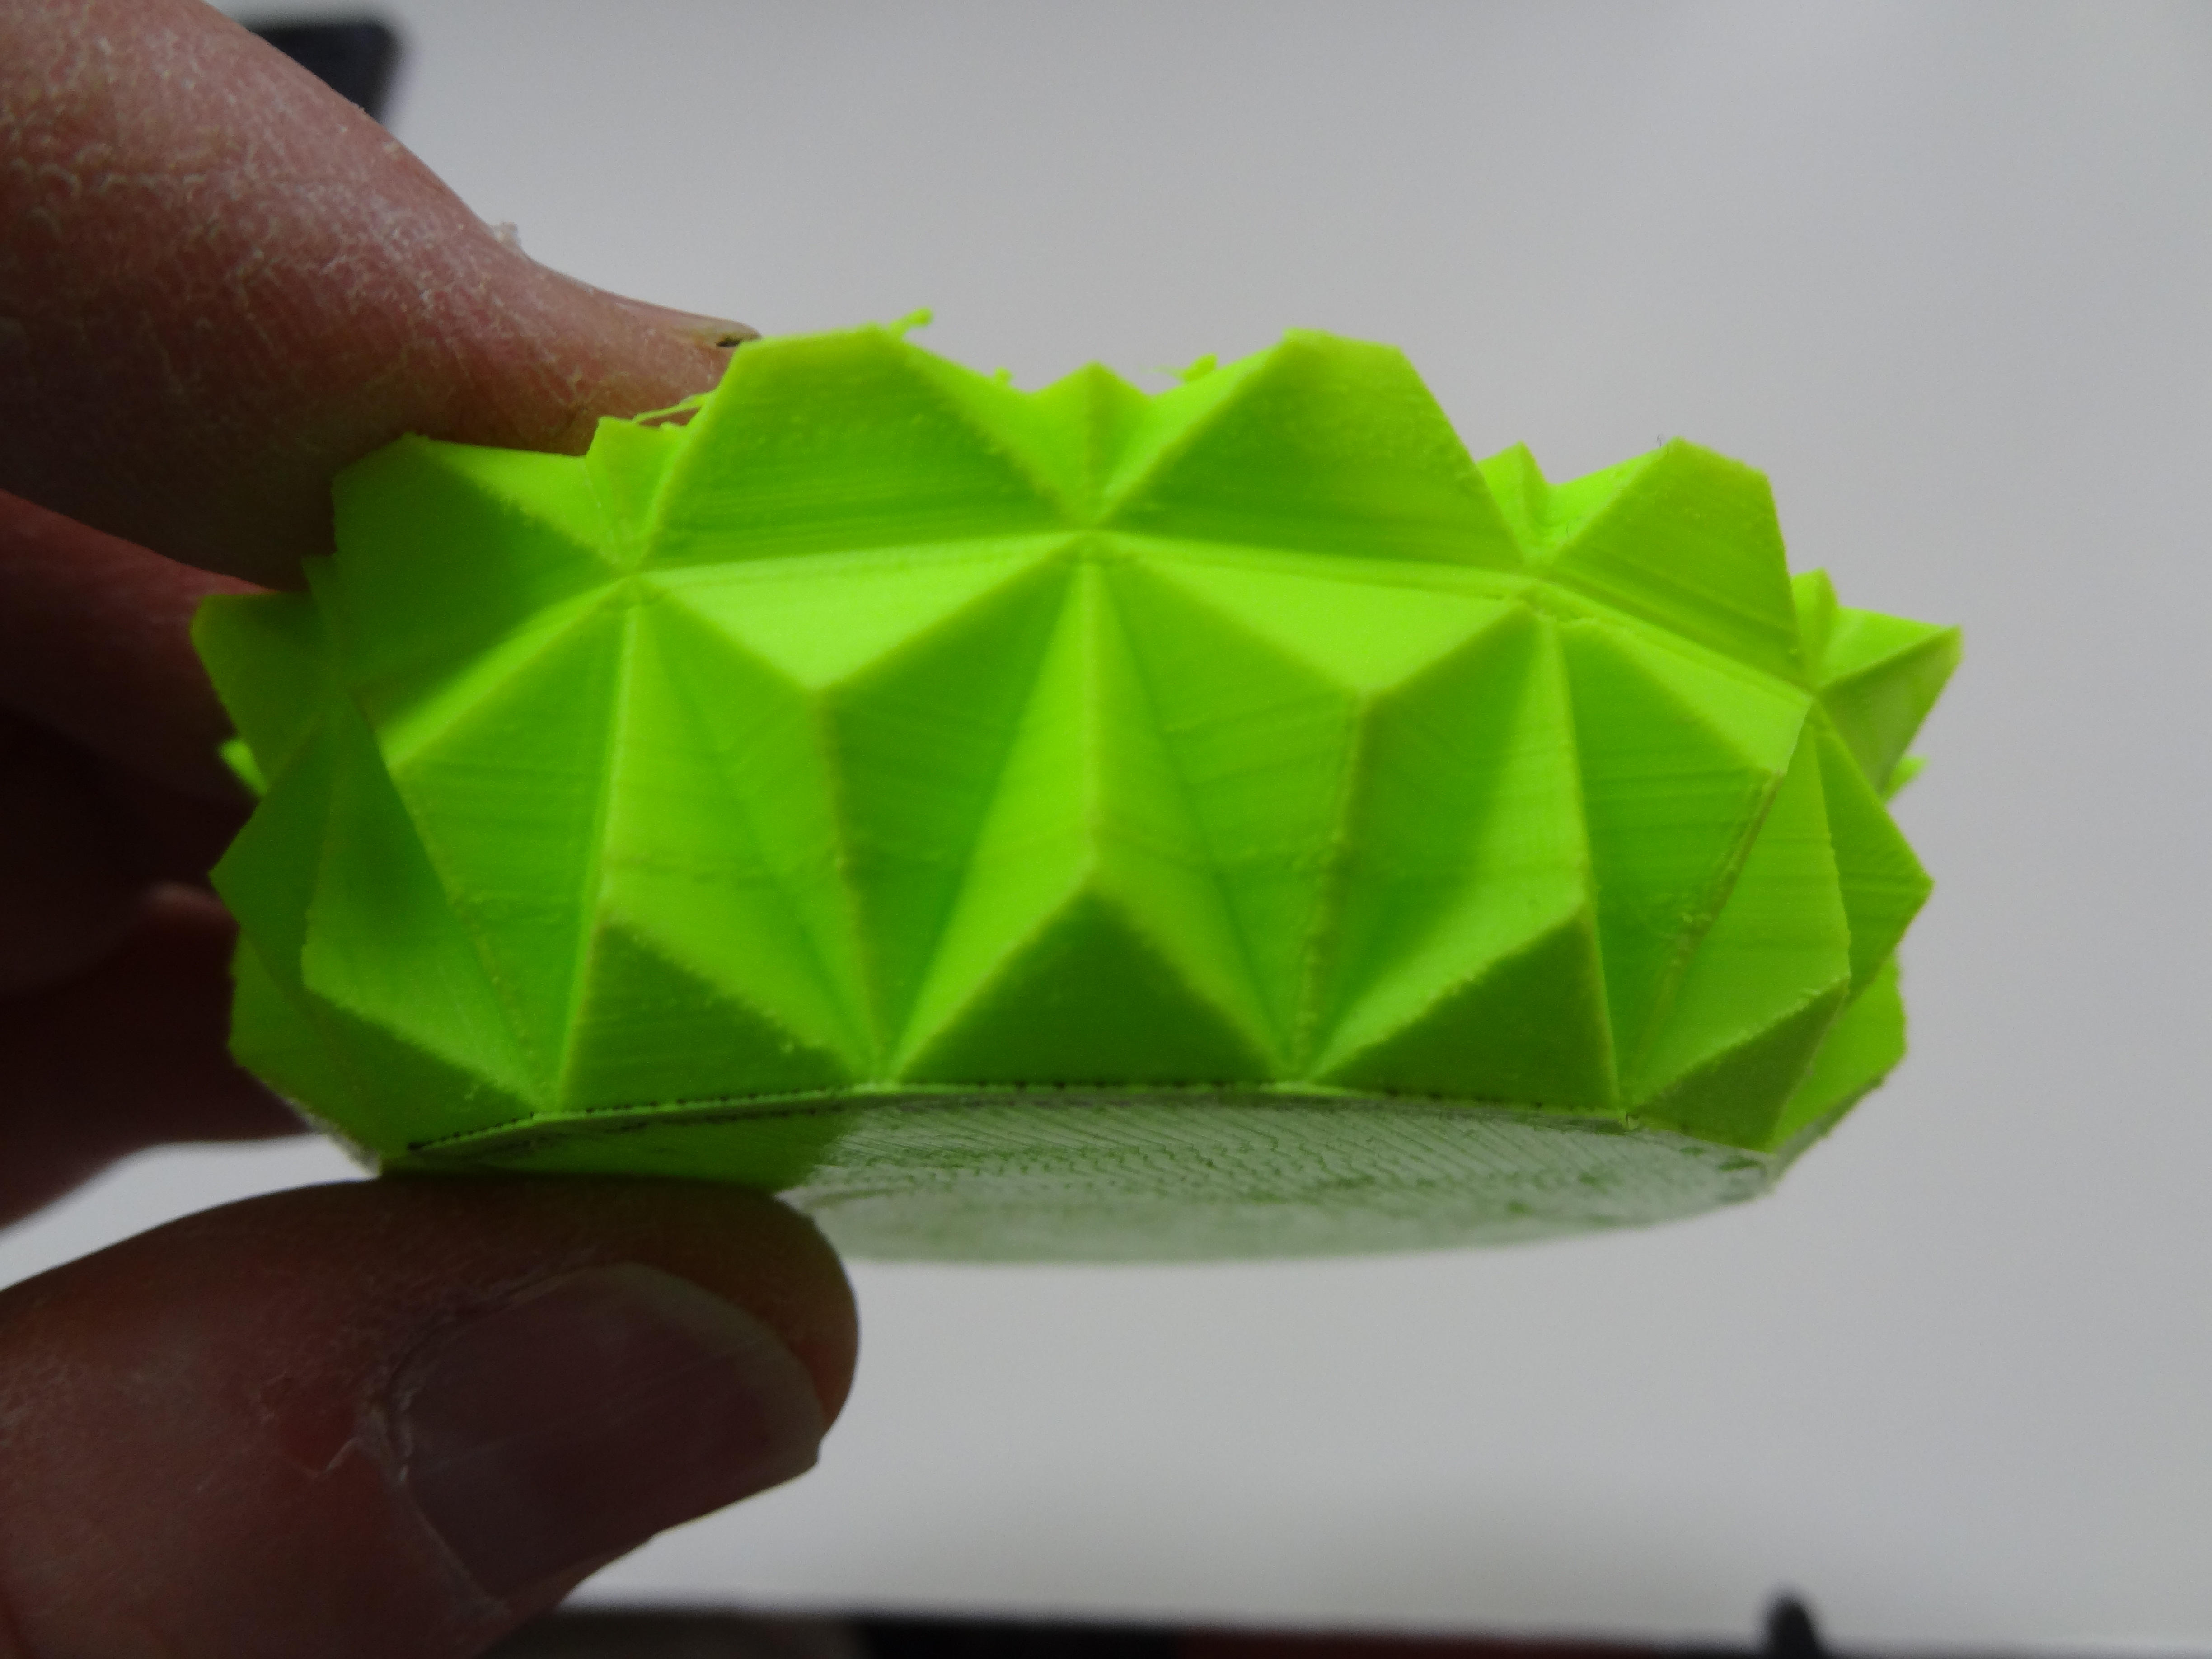 Things got off to a good start, but somewhere a few hours into the build the green cartridge stopped extruding. What I found was the machine “air printing” and some of the black that was part of the two-color build was now tossed around the machine (not having the green part printed to the layer where the black would take part in the build). The problem turned out to be the cartridge was jammed; I could see shards of green filament inside the center of the cartridge hub below the extruder drive. The black cartridge was perfectly fine. The picture above is how far it got before jamming, but you probably should not judge that build as the best because the cartridge was defective. However, after this was cleaned up, I printed a black only one in smaller size and in “Draft” mode.
 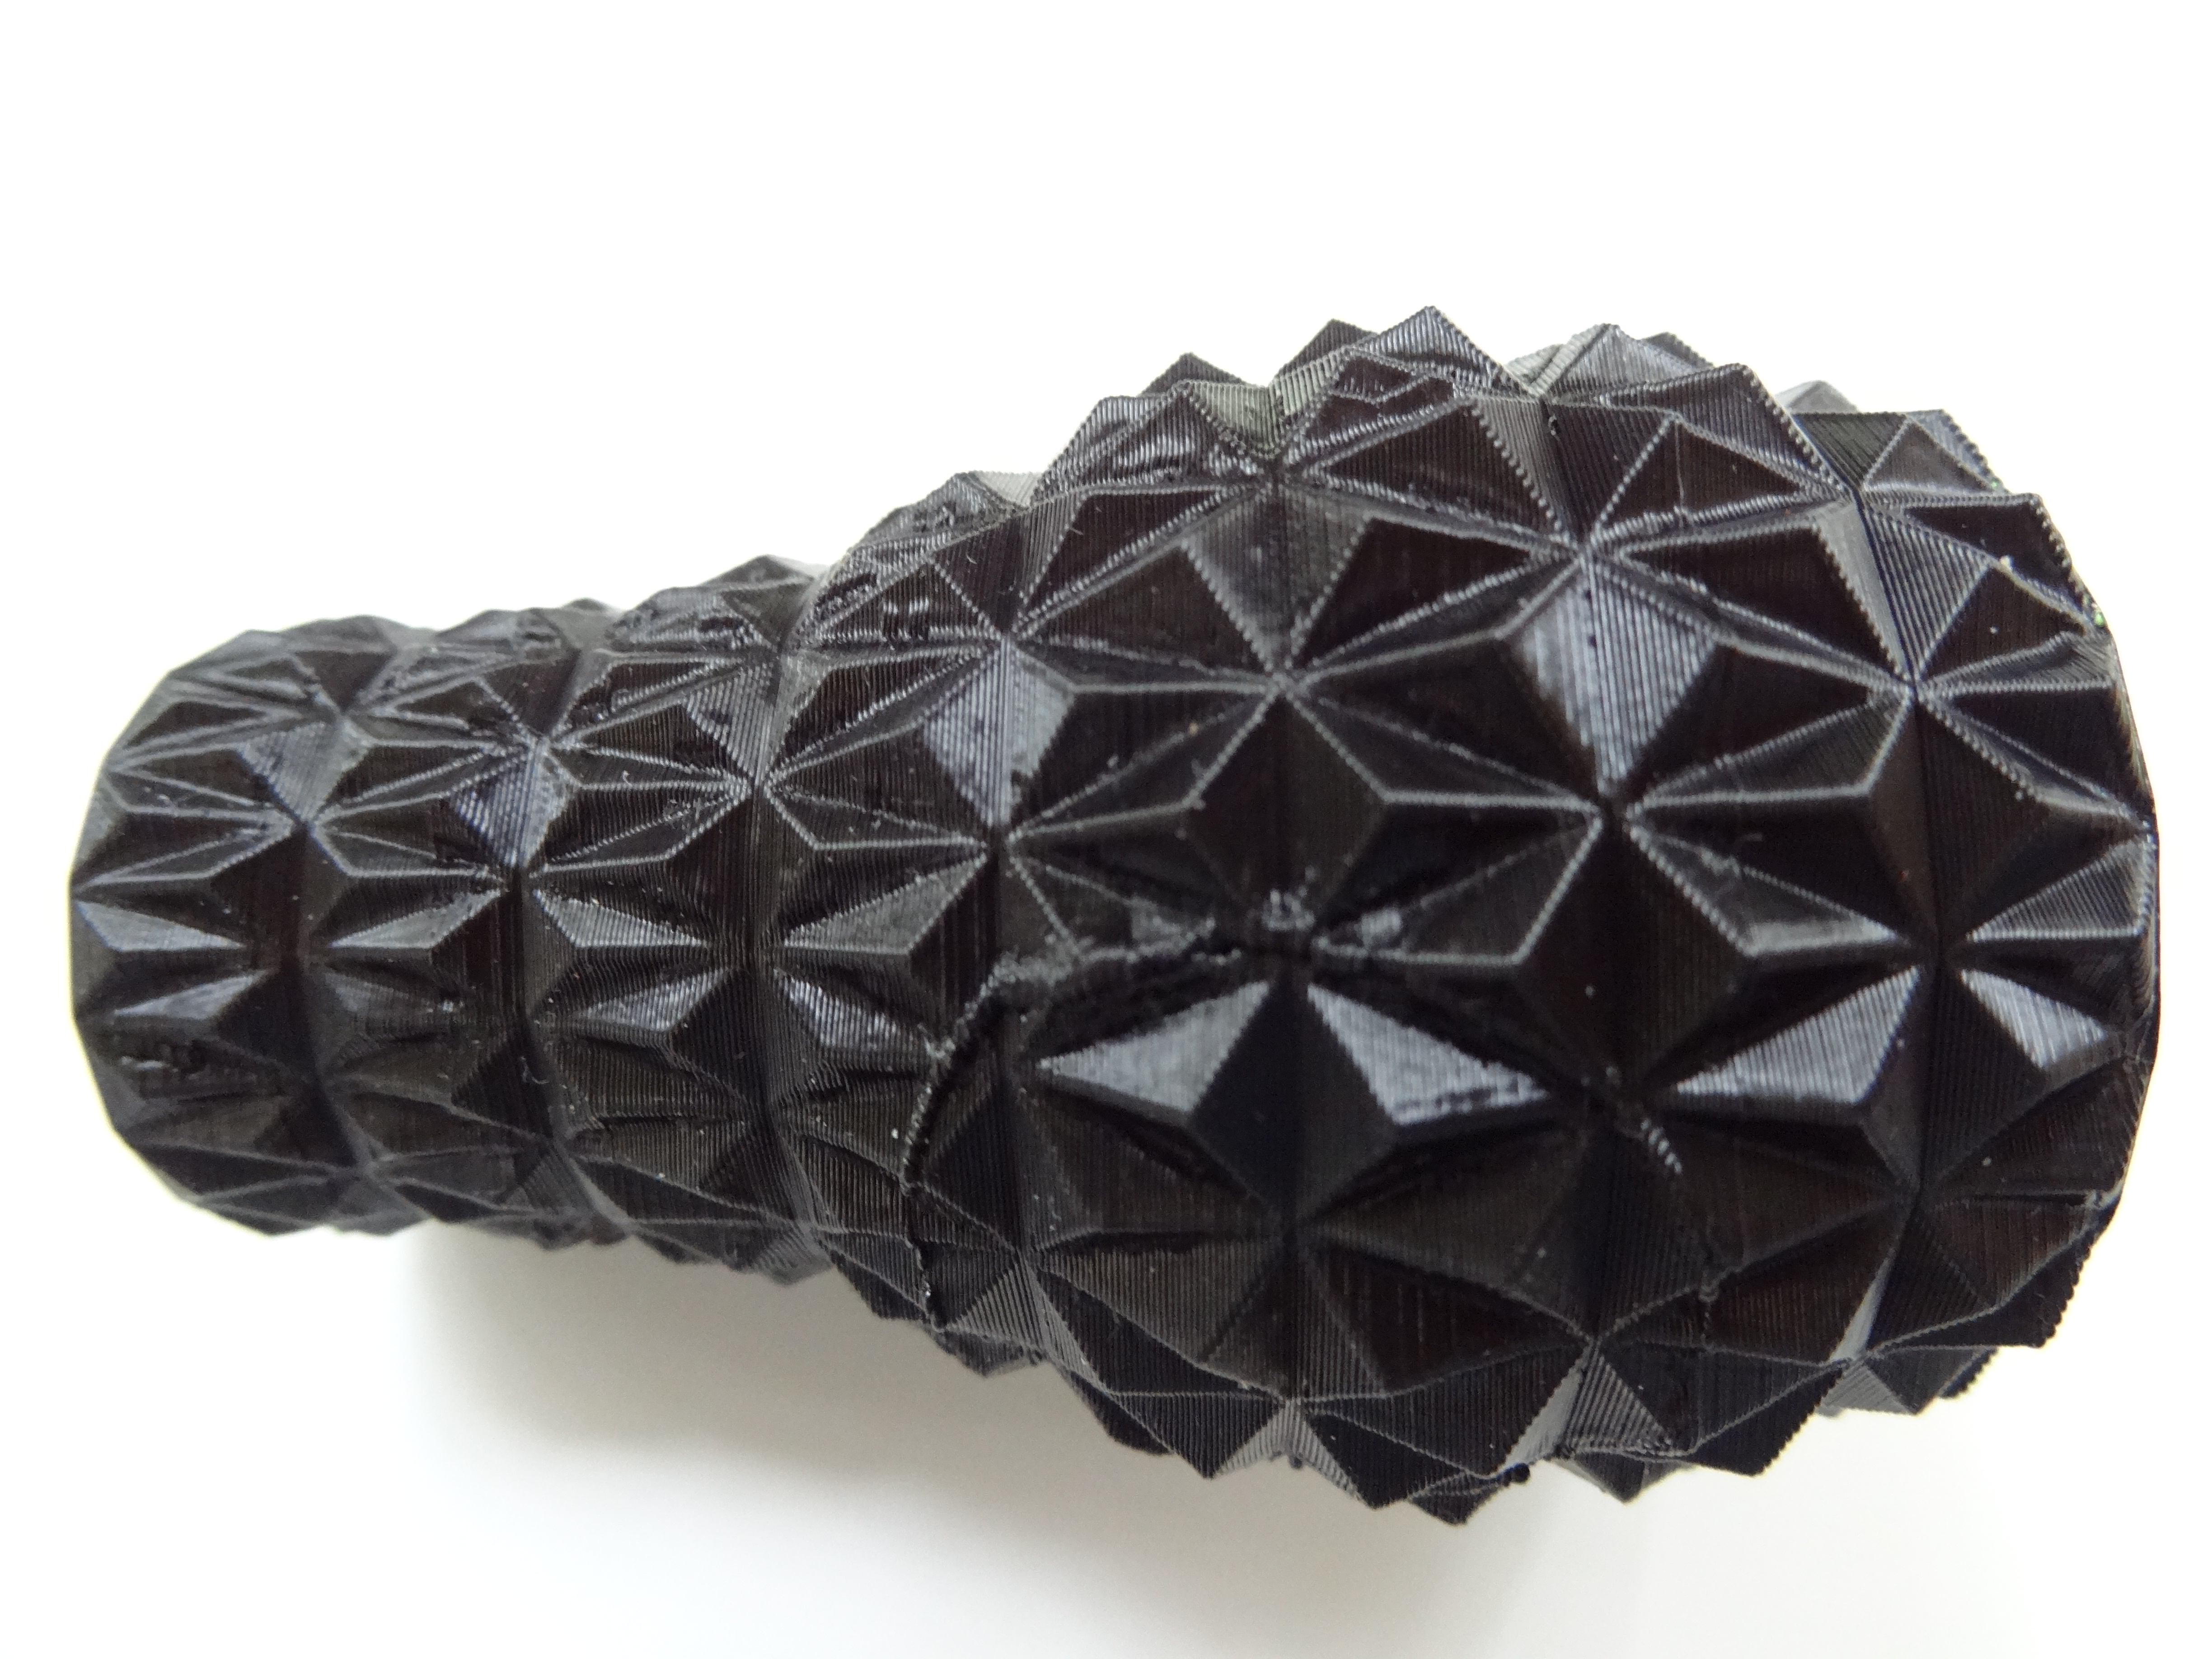 The results in this fastest mode with 200 micron layers is incredible. Yes I’m disappointed that my first build failed due to the green cartridge. However, a note to customer support got a fast response and a new cartridge is being sent to replace the defective one. The picture on the left is that build. I’m not sure I will use the 70 micron layer height much if the 200 micron builds are this good (and remember, this is the fastest setting!). The model here is about 3.5″ high.
While the Cube3 does not have a webcam to monitor prints, it does have a 2D side view of the part you are printing as a “progress bar” of sorts. And this can be viewed not only from the unit’s display but also in the apps that are used to sent it files. Both the android and iOS apps work but neither of thes e mobile apps allow for the modification of the part before printing (such as scaling) at least for now. So this is all I’ve been able to print so far, and I rather wait to get the green replacement to try more builds. The small green circle is another try at the vase in green with the green cartridge on the right side, using the same draft mode. But alas, the green cartridge is stuck and will do no more…
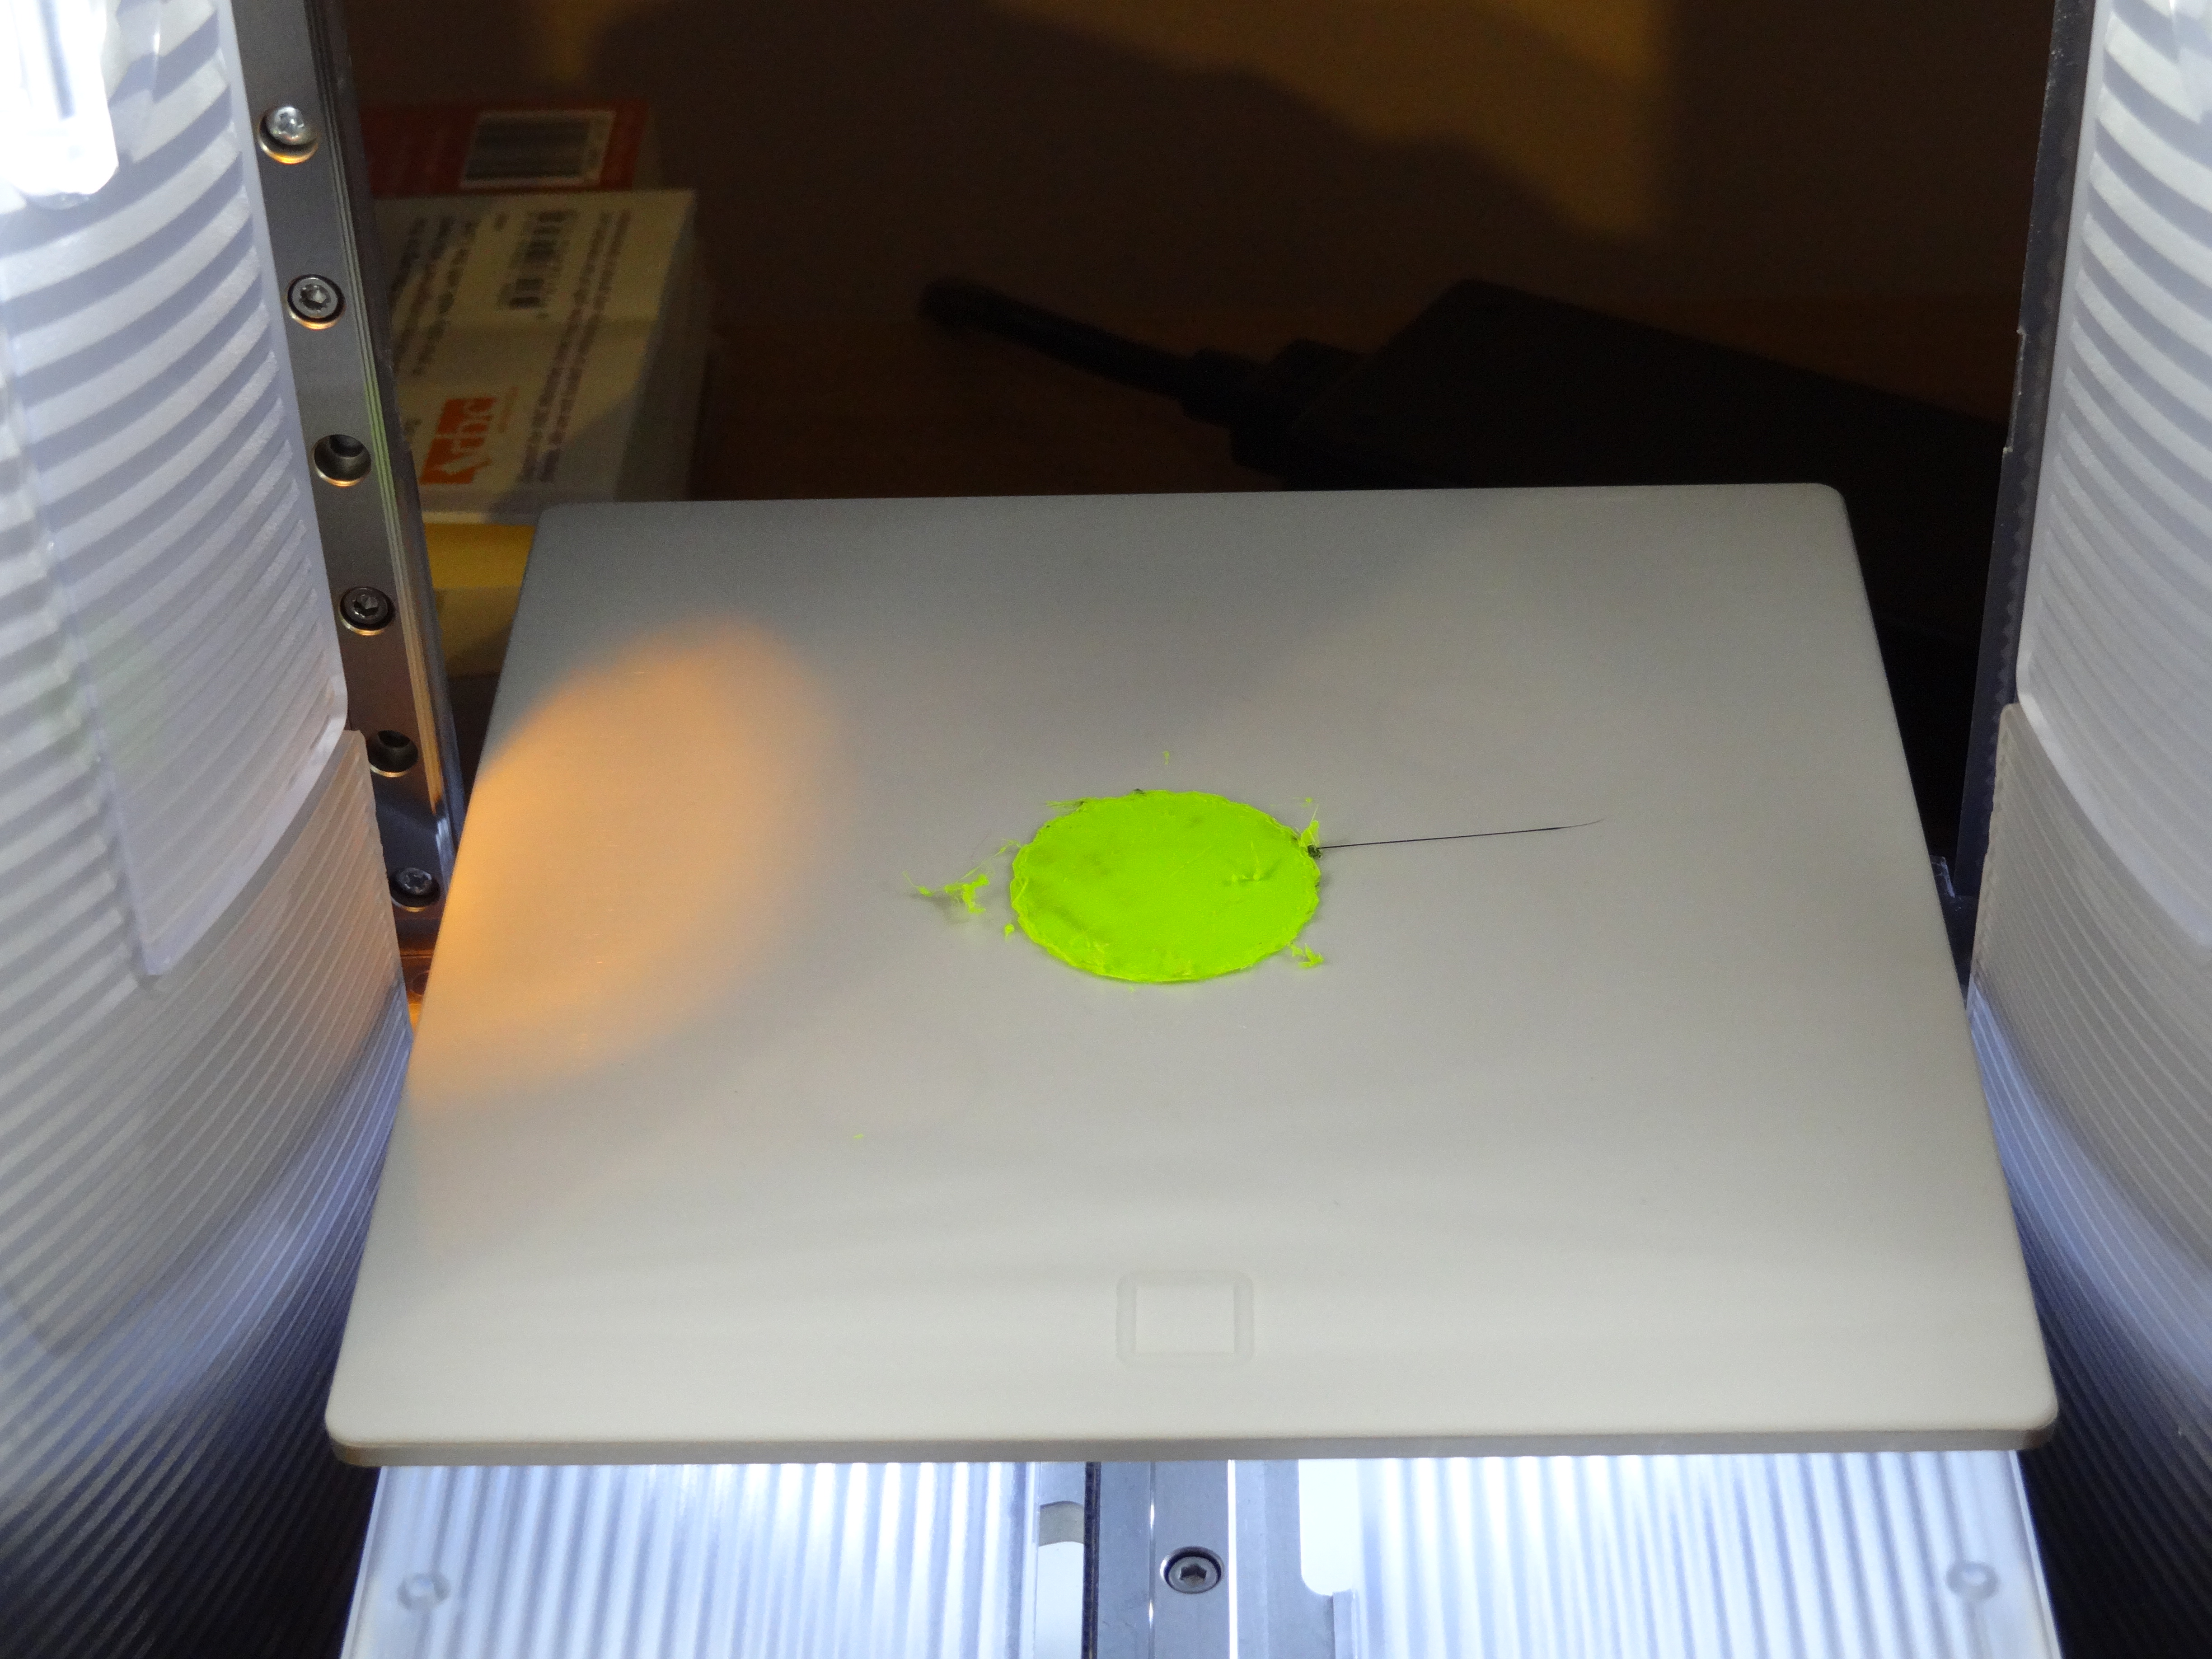
So am I pleased with this? Yes, while frustrating to get a bad cartridge out of the box new, the machine itself is lightyears ahead of the previous Cube generations. There are some things not easily spotted unless you look past covers and slots. For one, the internal chassis is CNC’d aluminum frames, not pressed steel as in the earlier Cubes. This makes the unit very light. Dovetail linear bearings are used for all three axes. While mine still makes a few squeaks and squawks, I suspect it will get quieter with use. The waste tanks are hidden in each side but easily removed to empty. The build plate is a plastic coated aluminum plate with embedded magnets to attach it. Be careful – they are strong – and not obvious where they are unless you see the mounting pad on the machine where they attach. There is a fan for the heater assembly in the head and a separate fan for cooling the part top layer. Both are hidden in the head, which is pretty small to begin with. Autoleveling and height adjustment are completely automatic and appear to use an optical sensor to determine the adjustments – but I need to investigate this further.
So despite the cartridge problem, I’d highly recommend this unit for someone either new or experienced in 3D printing. And I’ll be doing more builds and examples soon with comparisons to commercial machines that cost many times more than this does.
UPDATE: Based on early customer experiences, the firmware and calibration options have been improved to adjust for small, but important differences in the two nozzle heights. This change has greatly improved my results – one nozzle was slightly higher than the other, and if you used that nozzle to build, the slightly lower one would nudge the build layer and cause issues. As of late November, I’m waiting for new cartridges (which were listed as shipping on 11/25). I still have some material on my original black and green PLA cartridges, but without refills I’m going to have an idle machine.

Thanks for such detailed review, Eric. I guess they will do more improvement for that cartridge issue before they open the entire shipment for us 🙂 i will be perfect if you can share your double-color work when you got new cartridge.
Yes, as soon as I am able to try a dual color part I’ll update this post or add a new one. They tell me my replacement cartridge is on the way.
Thanks for the review! I’m very close to ordering a cube 3. We have a MB Z18 at work and the first 2 months we had it were pure hell. It’s working ok now but I don’t want to go through a headache like that at home.
Well, compared to the Makerbot Mini @ $1375 there is no comparison. The precision of the mechanism and array of features for $375 less is a no brainer. Much larger build area, dual nozzles, color touchscreen, etc., and it worked right out of the box. Cartridges are a simple replacement and things do happen with new tech like this, but the head is just a heater and the main wear components (nozzle, filament drive) are replaced every time you change a cartridge.
Thanks for the update! Is that keychain just like the cad says it should be?
Ryan- the cad for that is stored in the cube itself as a demo file, so I can’t compare that to what it is supposed to be. In the next round of tests I’ll be making parts to determine dimensional accuracy -stay tuned!
Hi Eric, I got my cube 3 and I love it!! I cant believe how well it works from the setup to the completed print. The layers are virtually invisible in a sample print that included a cone, sphere, box and cap. The interference fit when making snap fit parts is amazingly accurate. I’m new to printing and my only difficulty is setting the proper gap. The auto setting printed a poor test piece and when i used the paper gauge it worked well but i was still unsure if it was perfect. How much resistance is supposed to be felt when sliding the gauge between the nozzle and table? If i had one complaint it would be that the nozzle will drip slightly at the beginning of the print between when the wiper tries to clean the jet in one pass and the head touching the build plate…perhaps they could address this by having a little deposit on the build plate but outside the print area because if you have a logo or any type of design in the first layer or bottom of the part that touches the build plate it’ll smear in and could affect the look.
I hope to hear what you have experienced with more use on your cube 3.
Ryan: great! My only limitation now is the lack of additional cartridges. I’ve ordered more but I only have the two supplied with the unit. As for the drip, I think those details will be addressed in new firmware or Cube client updates. And to autogap, be sure your build plate is completely clean. In manual gap setting, the paper should feel some resistance to movement, but not with a lot of force to move it. And this relies on a clean nozzle – any bits of dirt there will offset the result. You might have to tweak the setting using manual mode until you can correlate the correct paper gap “feel” to successful first layer results.
Hi Eric, I received my cube3 3 weeks ago as a birthday present.
I had the same cartdridge problem on both cartdridges, the black one from day one (it isn’t even detected by the printer), then the neon green this week end mid-print
I guess they still have a production problem on cartdriges.
Do you experience any problem with the cubify windows software? Mine can’t produce the printer file from stl, and the error message doesn’t give any clue about the cause. I must print from my iphone!
I emailed support, several times but had no answer sofar.
So far the client software has not caused me any issues. I’m running version 1.27 on a relatively simple Windows 7 (Home Premium) laptop. Which OS / computer type are you using (Mac, Windows?). Be sure it has the recommended minimum resources (memory, processor, etc.) to run the client.
If the cartridge is not detected by the printer the cause may be a poor connection to the ID chip on the cartridge. If you look carefully at the “bottom” side of the cartridge (the side that faces in to the Cube) you should see two small rectangular electrical contacts. The connector is on the opposite side of the Cube. Perhaps the contacts are dirty or the spring contacts in the Cube are not touching the chip when it is loaded.
Hi everybody.
I got mine 3 weeks ago and experienced some problems I’m progressively solving.
FIrst problem was that one of the cartdriges wasn’t detected by the printer.
Second one was, again, an other cartdrige stopped working mid-print. Apprently because the filament was somehow stuck in the melting tip or somewhere else in the cartrigde.
Many people experienced the same problems, this seems to be a production quality issue, but Cubify accepted to change them at no cost under the warranty.
Third one was about the cubify software that can’t produce a print file when the computer settings are dfferent from English (American) (mine was French (France)…).
I however managed to produce few prints before running out of working print cartridges.
Even if I may have a slow learning curve, it’s still fun to use.
I hope people at cubufy are good willed (they seem to) and will solve all those glitches quickly.
Yes, since the launch a little over a month ago there have been several client updates, so be sure you are using the latest one. I too had some problems with those first client releases. And the cartridge issue will get solved – some patience of the new owners and good feedback will provide valuable space and info for great improvements to be made. I am in the US and still have just the first two cartridges that came with the unit – I’m waiting for a large order of ABS and PLA both. And I don’t want to run out, as I have a big demo in mid-December to attend with it, so I’m keeping my fingers crossed that the cartridges will be out by then.
Thanks much for the detail you went to. I hope they work out the kinks. Mine is scheduled to be here in two days.
Ken