Robo R2 – the big brother to the C2

Last week the box with my R2 came after a long 6 month wait from pre-order.  And I was not disappointed, but for one weird thing.  First, it is quite a massive machine, larger than an Ultimaker 2.  The 5″ touchscreen is half the front lower panel.  There is a front door with a magnetic latch, unlike the C2 which has no door at all.  Mechanically the R2 shares the general design layout and setup of the C2, but there are some differences.  For one, there is a webcam installed on the left inner panel (looking from the front of the unit).   And the heated build plate is magnetically attached but leveling screws are present which must be manually adjusted, though there is a guided process from the menu.

Unpacking was routine, and the dreaded inner door scratches people reported in early shipments were not present because there was a nice piece of plastic film protecting it.

As I completed unpacking it, I noticed that at the top of the Z screw a bearing was missing.  I checked the packaging for it and could not find it.  To be sure, I even searched in the electronics compartment.  Thankfully this is just a press-in-place 608 skate bearing and I happen to have plenty of those around of good quality. Its purpose is to fix the end of the Z screw so it will not wobble.  If you read my review of the C2 you will recall that I discovered the same bearing there to be dislodged after several hours of use.

Powering it up and after connecting to my WiFi it reported a firmware update was available so I immediately did that and waited for the process to complete.  I then did the bed level adjustment and the Z height offset.  Eager to get it going, I loaded the blue PLA filament it came with and started printing.  And remarkably, everything worked as it should have!

So straight out of the box, plus one firmware update and it worked perfectly.  I’ll get some close up pictures of the machine itself as well as some prints to show you how it does, but the default settings in Cura for PLA give fantastic results.

UPDATE

So now that it is several months later, how did it go?  The main thing was as I started making new prints it became obvious that the Z screw had been bent in shipping or perhaps even at the factory.  Long story short, Robo3D replaced the Z screw fairly quickly once I put a ticket in for warranty issues…. initially wanting me to sent it back (quite a chore) or as I suggested, just send me the part and I’ll return the dud if necessary.  Well, not necessary to return it so I got it in 2 weeks and replaced it in about 1 hour’s work.  Did that get things fixed?  Yes, the Z banding disappeared!  And it has continued to be a reliable machine though for the moment it is offline for the time being… other machines being evaluated and so forth – details to follow!

Robo C2 – the next generation

I purchased a Robo C2 from Amazon 6 weeks ago, and figured it was time to collect my experiences to date. It came packed very well for shipping, lots of accessories and a small reel of filament. There apparently are not many out there yet. Let me start with the good: it has WiFi remote control with over-the-air updates using Octoprint (I’ve had at least 6 updates since I started using it), but it also has a USB front port for direct load of jobs, a color touch screen (though more on that later), automatic leveling (but some say not fully implemented yet), a nice aesthetic for design, and a fairly large build envelope for its overall size. There is a smartphone app to control it too. In general, mine seems very well built but there have been some problems out of the box. On the good side, I’ve gotten some fantastic prints out of it, but also some nasty failures.

This truly should have been a machine that would knock the competition out of the park. With some QC and tweaks it might eventually. But if my experience is any indication, as of now it just doesn’t. You expect a learning curve but if we are to have a reliable “appliance” there must be no points of major fail. So where does this machine fall short?

First there is no heated bed.  OK, not a show stopper – without a heated bed there are still loads of filament options.  I’ve tried PLA (good), TPU (limited success), PVB – Polymaker’s new alcohol polished filament -(OK but not consistent).  Obviously ABS is out.  There are grades of enhanced PLA (Polymaker PolyMAX PLA) which also have worked well.  For now though my best machine for TPU has been my Monoprice Makerselect.

I’ll start with a minor annoyance. The first thing you notice after you turn it on is the head cooling fan.  And by the way, my power switch is “backwards.” The machine turns on when the circle is depressed but the convention is for the line to be “on.” In IEC 5007 standard, the power on (line) symbol, appears on one end of a toggle switch that the control places the equipment into a fully powered state. It comes from the binary system (1 or | means on) – thus “0” means off… The electronics are neatly out of the way in the base of the machine. There is a Raspberry Pi board on the left side and a Robo control board on the right.

So, that extruder fan runs at full blast all the time even if the extruder is cold…  I have not checked but either the fan is a sleeve bearing design or maybe just noisier that others of its type, but that has not been the biggest issue. Now you might ask “why is fan noise an issue?” Answer: this is meant to live in a room like a classroom or other living space and who wants a thresher running at all times? Somewhere I thought there was a control for that fan but I have not found it in the C2’s menus just yet…

But a much bigger concern is this: If you look at the various support boards you’ll see that getting the Z offset right has been a big gap in this machine (sorry for the bad pun…). The build plate has 4 magnets that stick it to 4 acorn nuts. Two of my magnets were loose (clearly they were force fit at the factory, but with time the plastic creeped – so with a little superglue I got them fixed. On first use you manually level the bed by using the “Wizard” for leveling. So far so good. It calls for a piece of paper to be the gapping tool. However, if you use a single sheet of copy paper (at least for my unit) the head will go crashing into the build plate. What works for a gap tool is the heavy, single-layer cardboard you find backing a 9V battery package. Yes, that is many times thicker than a piece of copy paper… but for me it works. I destroyed several sheets of the black painter tape pads that cover the plastic bed before landing on that solution. To date I’ve not seen this addressed, and I also gouged out the build plate too. You can adjust the temperature, feed rate and fan % on the fly but not the Z offset. I would like to be able to dial in a change to the Z offset from the front panel, but if there is an option for that I did not find it. And in a recent update, the Z offset values after calibration have shifted from around 5mm to 14mm with no explanation as to why. As you might suspect, getting the Z offset exactly right is critical to getting a successful print.

Which takes me to the next issue. The Z stage design is typical – supported by two large rods with the Z screw in the middle of them. There is a bearing at the top of the Z screw to stabilize the end. That bearing came loose – again just force fitted like the build plate magnets and over time it popped out of the hole. There is nothing to positively keep it in place. Thankfully that is a trivial fix. Gently pushing on the front of the aluminum plate that attaches to the Z axis mechanics, you find that there is considerable mechanical “slop” or twist. It is as if the linear bearings are not correct for the shafts or the mount is not firmly attached to them. The play is at least 1-2mm at the front and you can clearly see the shift at the rods. Try this with a Wanhao D6 and you’ll get nowhere (these machines are the same price and incredibly rigid).

As for the touch screen, it is resistive – meaning the response is a bit slow. You can’t expect it to behave like your capacitive screen on your smart phone or tablet. I’ve adjusted to it but sometimes you want fast response – like when you are in a hurry cancelling a job when the head crashes into the build plate. The interface is full of features, they are logically arranged, but here and there one is left with some puzzling options. You can remove filament and reload through the Filament Change wizard. But if all you want to do is unload, there is not a direct option. So I ran the wizard up to getting the filament unloaded, then tried to use the “back arrow” to return to the main menu – nope – crash goes the interface and all I could do was shut it off and reboot.

Another thing I’ve noticed is the WiFi connection seems to get lost after a job starts. Restarting the Cura software (a customized version for Robo) usually seems to fix that. I have other 3D printers on my network (MakerBot, Mod-T) that never have this issue. Perhaps this is more a bug with the version of Cura that Robo supplies for this machine (2.3.1).

So I plan to continue testing this machine (of course with filament that does not require a heated bed). On wonders why not a glass plate instead of painter’s tape? If the IR sensor for leveling needs black, surely black glass might work?? Or how about BuildTak(tm)? I’ve created a CAD model of the build plate and will try BuildTak(tm) on it instead of black tape. If it works, look for it on Thingiverse! Thankfully Robo is sending me a new original one on warranty, but at the moment you can’t purchase them for extras.

More details to come and pictures as I get some time in the next few weeks.

UPDATE 5/08/17: I made a request to customer service concerning my crashed build plate and not too long after someone got back to me with a form to submit for a replacement. And a few days later I received not one but two new plates! This time, the magnets were glued in place (a bit of fog on the plastic from the cyanoacrylic glue was evident). In the mean time, I had replaced the tape on my original with BuildTak(tm) custom trimmed to fit. After resetting the gap, it works really well. Because the BuildTak is stiffer and a bit thicker than the painter’s tape pads it comes with, the craters in the top of the surface don’t matter. So I’m saving the new plates for later. I’ve lost count of updates, but things keep getting better. Print quality is great at the default (100 micron) layer thickness and the WiFi connection is not lost as much, though it still does. So it looks like they are serious about perfecting this machine, and I’m getting much more consistent prints. I still need to post some pictures – soon!

UPDATE 7/11/17: Wow, things have come a long way since the release. I lost track of the updates but the most recent one was quite a refresh of the user interface and one that makes sense to me. And the older customized Cura 2.3 client has been replaced with Cura 2.5 customized for the 2 series machines. What a difference! No more dropped WiFi connections for one. And the prints are outstanding at the “default” 100 microns.

So clearly Robo made a huge effort to get this into shape and with all of the updates I can fully recommend this model, and the R2 unit too (just got it and a review is being written this week).

Tiko Trials, Troubles and More

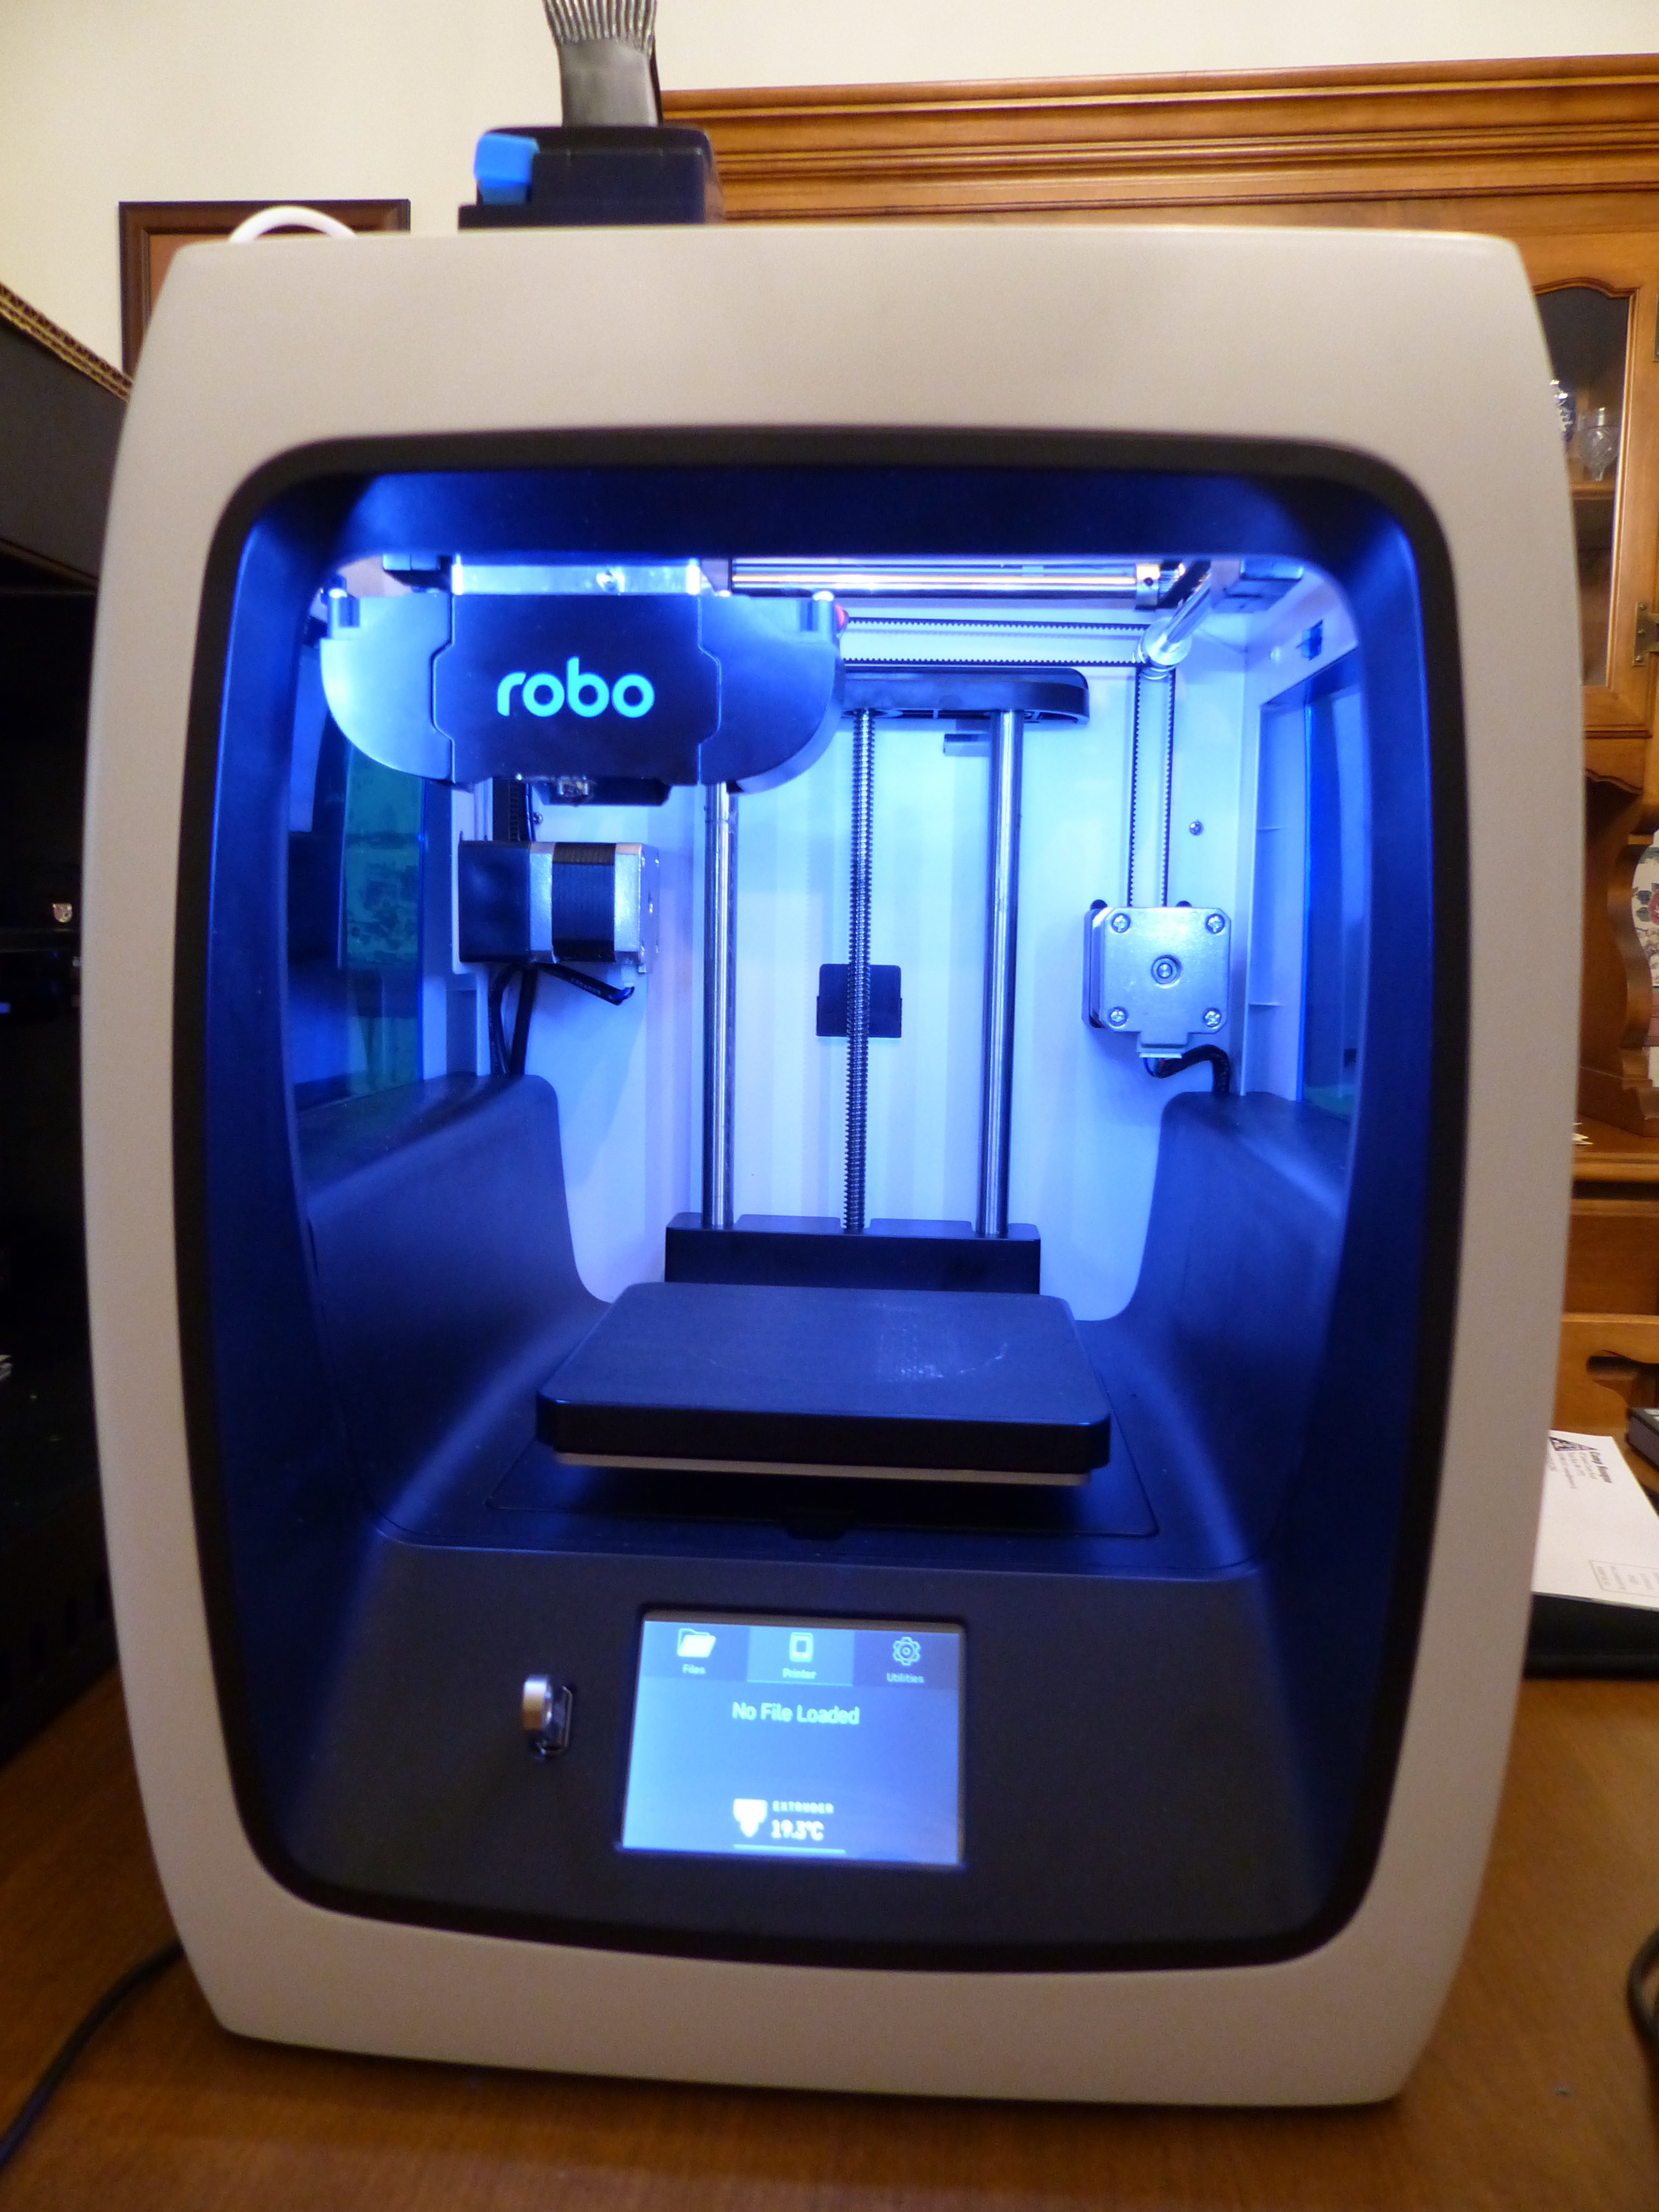
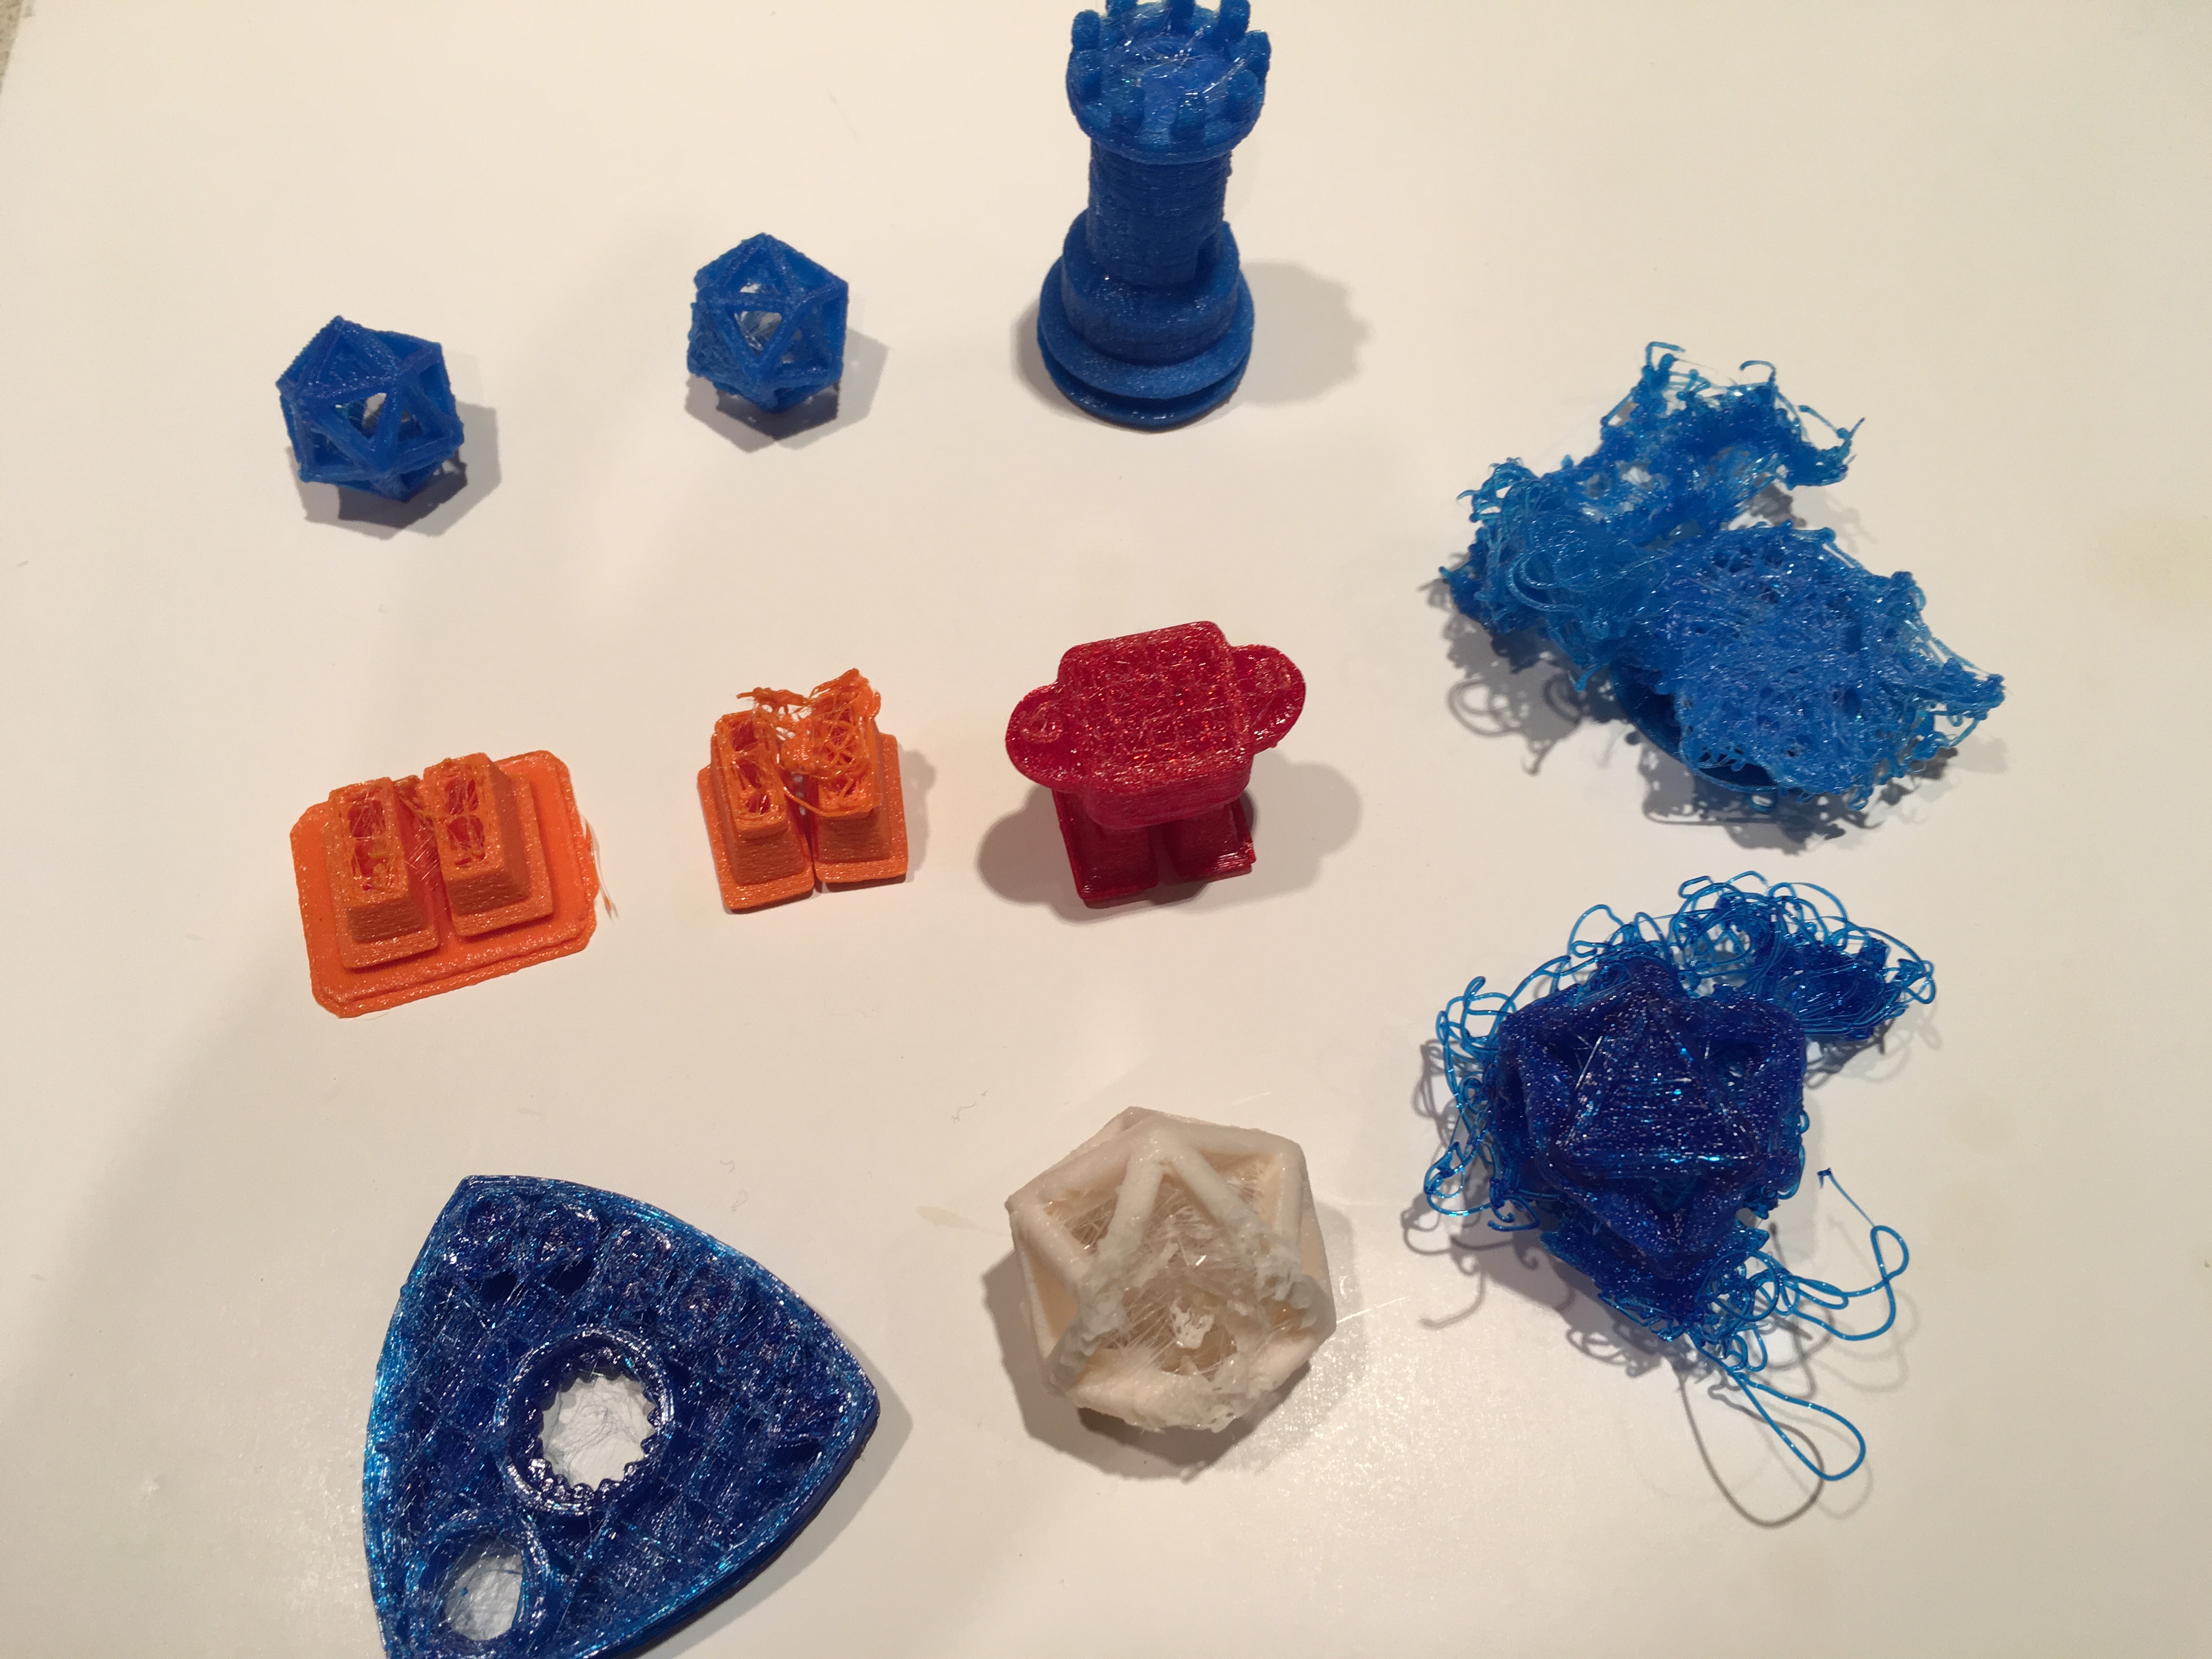
About two weeks ago my long-awaited Tiko mini delta 3D printer arrived. Promised to deliver over 14 months ago, I had high hopes that all of the major design and manufacturing issues had been solved. Not so.  The picture below chronicles a history of failed prints…

Mostly failed prints.

Mostly failed prints.

Starting from the upper left corner, that is the print which came attached to the build plate as a sample from the factory.  Next to the right is my local demo print.  Not too bad so far.  But then the next print (the rook) is leaning to one side and the plastic looks very distressed.  Those first 3 prints were with Tiko GEM filament that came with the machine.

I switched to orange PLA from MakerBot.  The Make Robot test piece failed in about the same place both times.  The filament jammed in the Bowden tube and had to be removed manually.  Next is a try with red translucent MakerBot PLA – got further but still no success.  And the rats nest to the right in the middle row is back to Tiko GEM PLA and was supposed to be a rook.  The rotor keychain on the bottom right failed to complete too – this was with M3D Cobalt Blue PLA.  The white part in the middle also failed and was Polymaker PolyMax PLA.  Finally, the last one on the right was back to M3D Cobalt Blue PLA – a larger try of the demo part it started with at the top.

In every case but for the one rook, the filament jammed behind the extruder nozzle.  Removing the filament manually I found in every case that heat creep and softening of the filament 1.5″ – 2″ above the tip caused a plug to form.  The extruder gear then would grind off the filament and the whole thing had shut down – no more extrusion.

This led me to wonder just what the temperature of the nozzle was really. Although I set it to 205C in their WIT control interface, all the evidence pointed to something wrong on the high side.  Andir_0022 
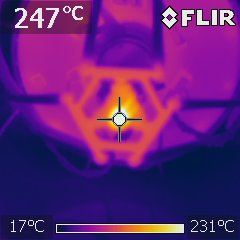
now you see why – my FLIR thermal camera is showing the tip temperature when I merely selected “heat nozzle.”  And when printing (set for 205C!)here is what I got – a whopping 270C!  Note that this design uses a PTFE Bowden tube to the head and no true active cooling of the extruder itself.  PTFE softens at 247C or thereabouts, and by 270C is all but useless.  Not to mention that PLA is not going to survive in the heat break area above because eventually it will significantly soften there.

This is exactly the behavior ir_0028
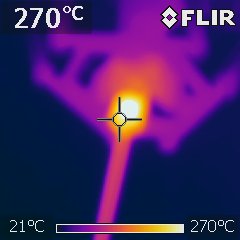
I was getting.  What to do?  Thankfully there is a recovery panel where you can force the machine to recalibrate the heater.  I decided to try this –  and the change in results was immediate.  I was able to print to completion the Make Robot and the demo sample but now a new problem is evident – layer shift.  You can clearly see this in the letter “M” on the Make Robot piece.  Why the shifts?  While not clear at this point, it appears to be a mechanical problem. One theory is that an axis motor gets stuck with the interfering Bowden tube.  It sure seems to be too long.  Another is that the control arms are too flimsy and bend when warm.  They clearly seem too flimsy to me, but somimg_09631
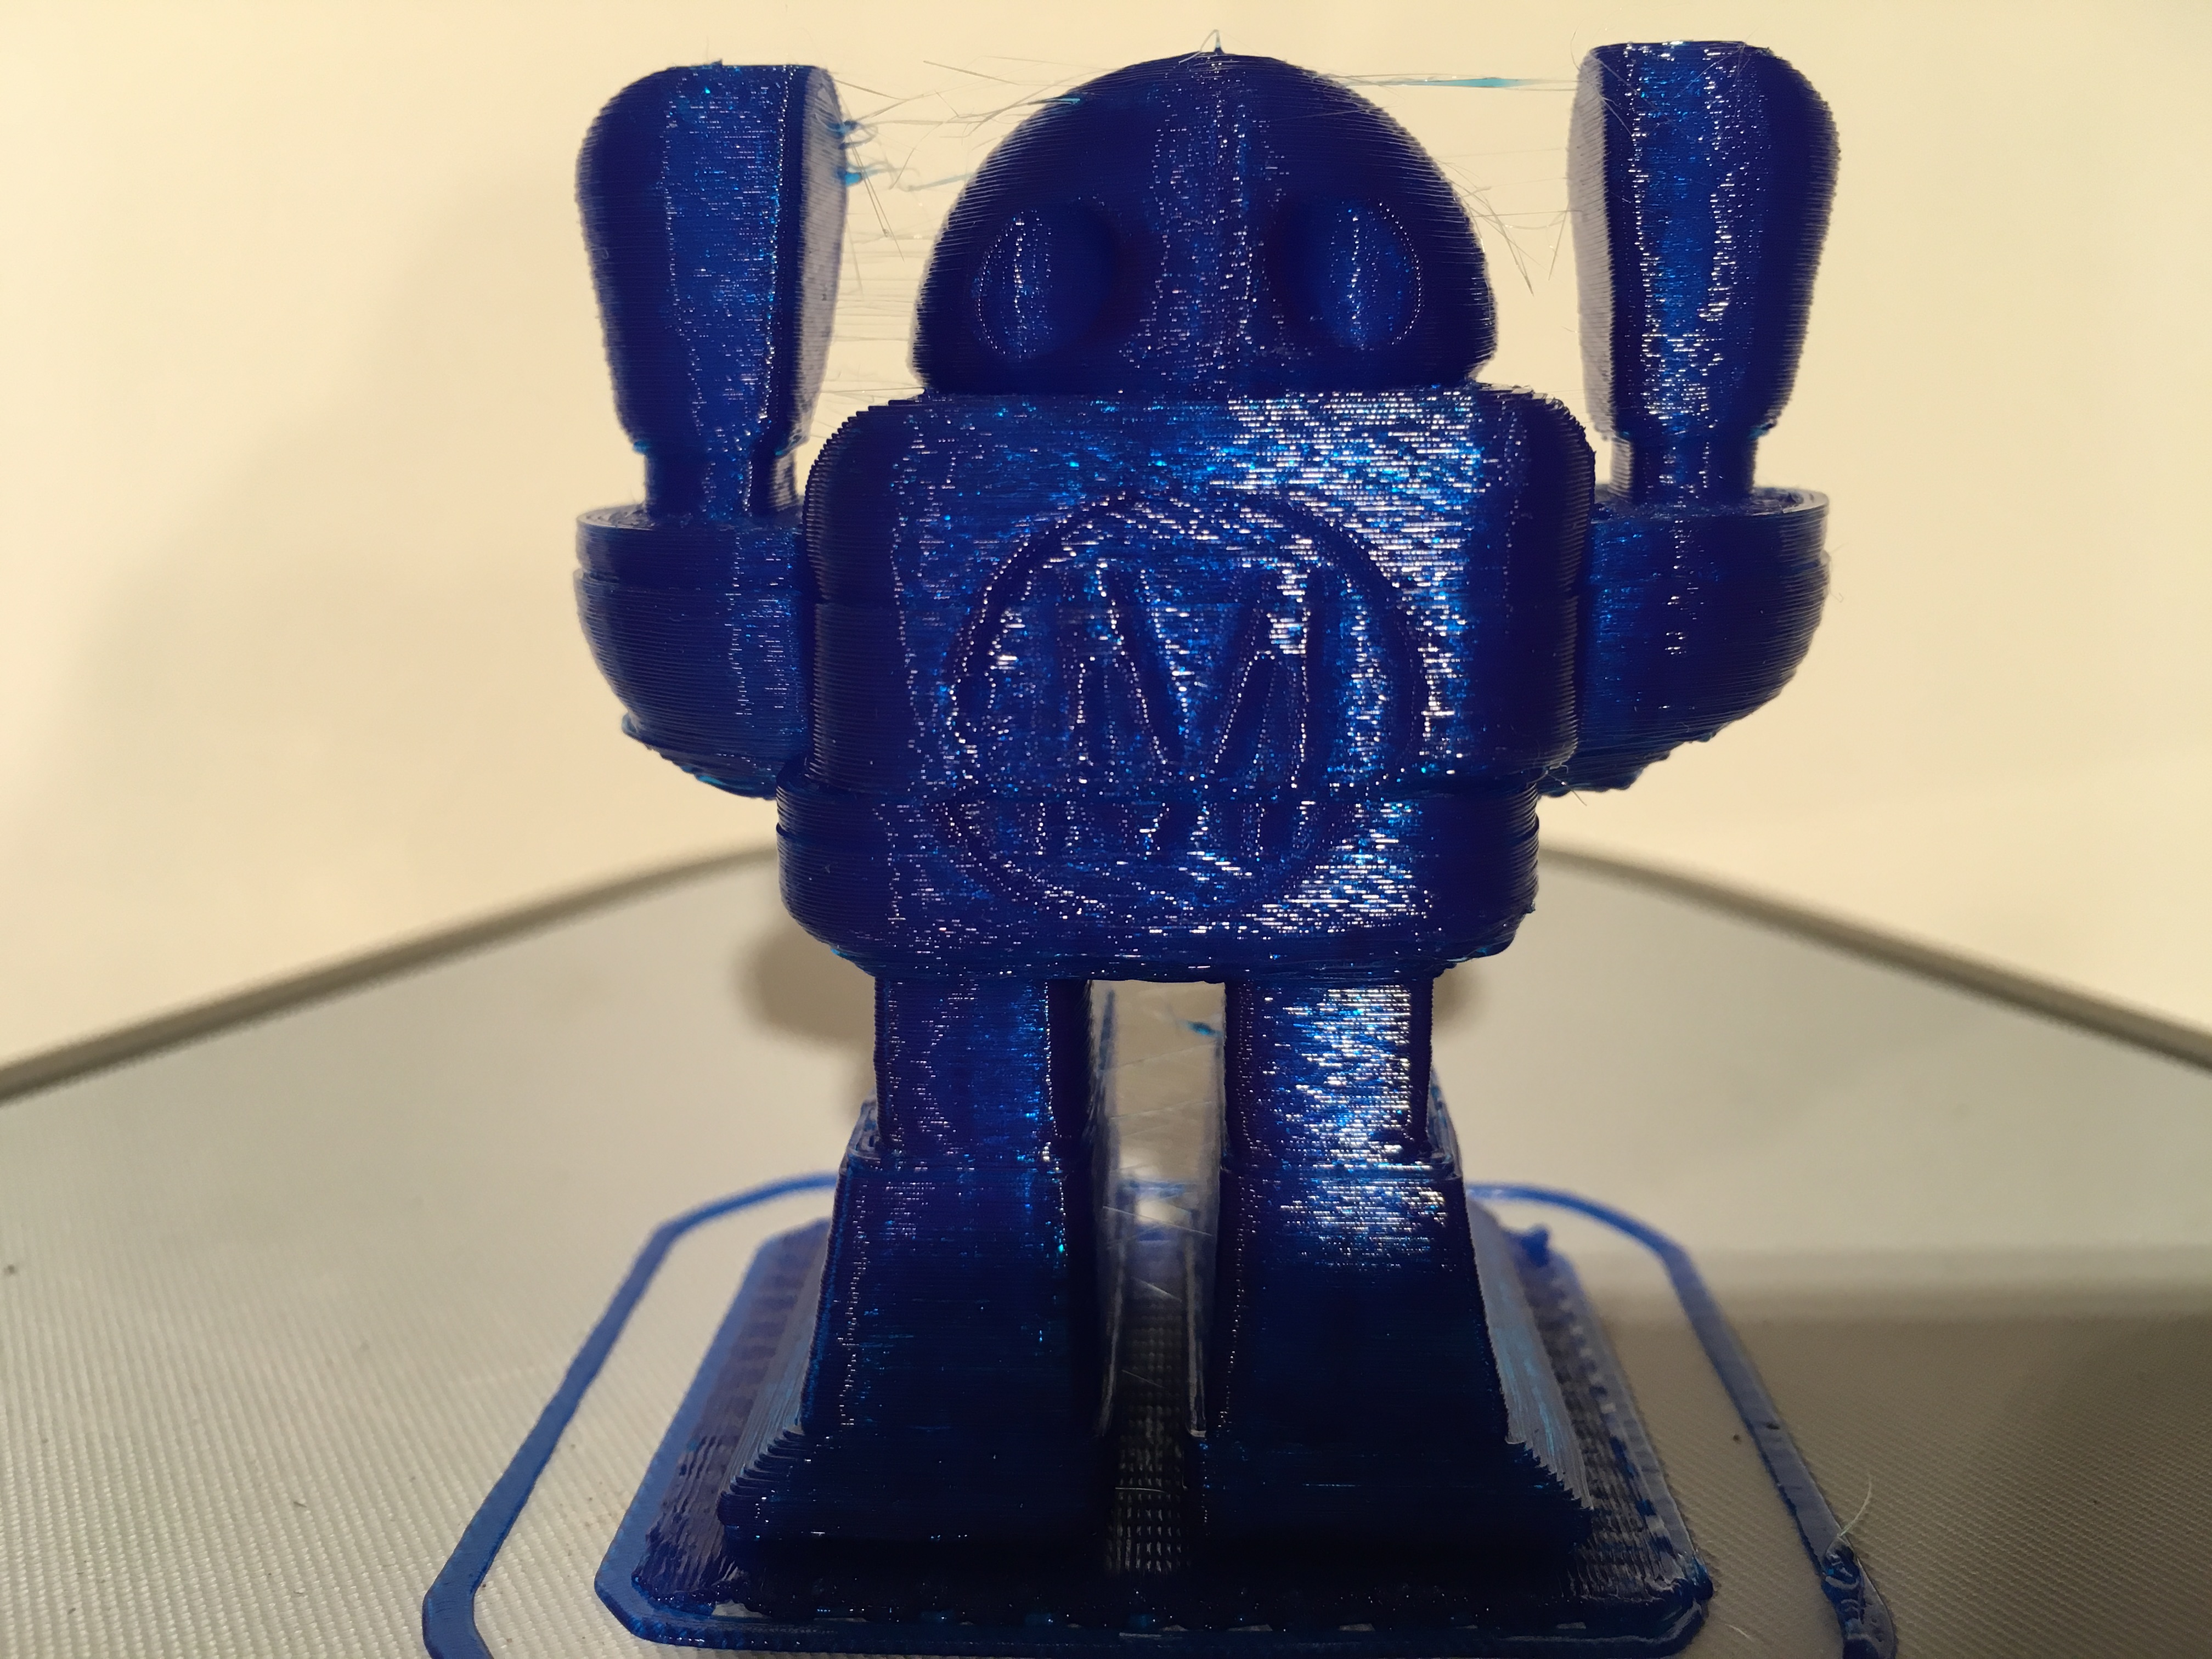
e bloggers think this is a deliberate choice.  Deliberate or not, the mechanical integrity of this 3D printer is in question, and many users are reporting this issue.  A third possibility mentioned is the slicer.  I might collect the gcode for the Make Robot and put it into a visualizer to see if indeed the math is wrong somehow and the machine is just doing what a corrupt slicer is saying to do.img_0964

BTW the hot-end heater has no thermistor or any means of direct temperature measurement by the controller.  They are relying on the DC resistance of the heater and then controlling the current into it based on some translation in the firmware.   There are no other wires coming from the heated end other than the digital accelerometer (used to determine leveling and mounted on the Bowden tube well above the hot end) and the two wires for the heater.  And in an October Kickstarter update, they discussed “solving” the jams caused by this heater.  This type of design is called a “self-regulating” heater, and these are most often applied where a specific target temperature is to be achieved.  The best example application is the heat tape you use for deicing a downspout or gutter in winter. It is certainly novel for a 3D printer, and from my engineering point of view a poor choice for a low-cost machine.  Temperature regulation needs to be precise and dynamic at the hot end – and this one has a very low mass – thus little “stored” heat to level things out.

So should you preorder one of these at the asking price of $199?  Knowing that I still do not have a truly working unit should help you decide.  Even my best print so far has lots of stringy webs from insufficient retraction. In the picture of the robot you can see this between the arms the and top of the head.  Apparently at least a few folks are getting decent results.  And as of this writing there is a “problem” with batch 4 and beyond but the Tiko folks have not even hinted at what that might be.  And refunds which have been offered and requested due to the long delay in delivery have been frozen…

So I ran two more test parts after the heater recalibration – and the second completed but clearly showed the start of jamming half-way through due to overheating behind the hot end.  So for now my plan is to put it back in the box and wait to see if some update is offered that gets the quality issues solved, assuming that actually can be done!  While there are a number of suggested modifications on the discussion areas, I intend to keep my machine “stock” for now.

UPDATE 1/27/17

There was a promised update for the web interface and the firmware today, and yes indeed, powering it up it got it just fine.  Remarkably, at least for my machine, the update actually made it work tremendously better – it actually got through a long print (3 hrs.) without a layer shift or jam.  Still stringy though…. and yes, now rafts seem a bit harder to get separated as some on their forums have mentioned.  I’m not using the GEM filament that came with it – it is getting discarded… but I’m keeping the spool and refilling it with something of known pedigree that works in other machines.  I have some empty MakerBot Mini spools which fit nicely though they hold perhaps only 35% of the Tiko-supplied full spool.  However they are smoother running because there is less pull needed to move the filament.  I’ll update with some pictures of the new parts soon.

UPDATE 1/28/17

OK, the long overnight print sort of failed… about halfway through the LFS Elephant (http://www.thingiverse.com/thing:257911) there is a clear reduction in extrusion rate, and while it did complete the build, the top-most layers are largely webs instead of solid skins.  I reduced the temperature to 200c for that job (based on how things were looking on the first set at 205c), but I’ve now changed filament again and am running a low-poly squirtle with transparent red pla at 205c.

The gallery above shows the progression of extrusion from a reasonably good layering to the failed region. The first image shows the bottom area of the LFS Elephant.  The second picture shows the clear transition from acceptable to low / loss of extrusion.  The last picture was taken in monochrome at the last and top-most layers.  Clearly the filament is no longer being extruded to match the machine’s movement rate. These pictures were taken with a Celestron FlipView digital microscope at lowest magnification.

UPDATE 2/8/2017

As I hinted at earlier, the signs of business failure were becoming evident. And now if you check the project comments you’ll discover that indeed the Tiko project is in very deep distress. Despite promises, as these things tend to go I do not expect there will be refunds to folks who have preordered one or any more batches to be manufactured and sent – nor warranty support to those who were fortunate enough to be in the three batches that did get delivered (1 for Canada, 2 for US). With Monoprice to offer a $149 delta printer soon with practically the same build volume, touchscreen and WiFi control – the Tiko is simply too little too late. So another Kickstarter 3D printer project goes crashing – the success rate of 3D printer offerings on crowdfunding would be interesting to determine – I’d guess only about 1/3 – 1/2 actually deliver. As far as the Tiko goes, whatever community springs up to be the unofficial support will determine its ultimate usefulness.  For now, I don’t have the time to delve into modifications and improvements. And if all else fails, I’ve got an interesting WiFi controlled desk lamp!

UPDATE 2/13/2017

Could not say it better: Tiko 3d Printer Hard Landing

UPDATE 2/22/2017

The long promised update is now posted. A significant quote from it goes as follows:

“Despite the year and a half of hardware and software setbacks, manufacturing challenges, repeated delays, regulatory hurdles, unending certification requirements, unplanned operating expenses, logistical nightmares, sleepless nights, strained relationships, frustrated suppliers, a disgruntled community, new competitors, and a jaded industry, we simply refused to give up. Day after day, we kept fighting with all our hearts. Evenings. Weekends. More engineers. More developers. More prototypes. More testing. Nothing was ever enough. We did everything we could to turn this around, but by November 2016, we were at a breaking point. With resources running thin, and options running out, we prepared for one final push. We believed software improvements could solve the remaining technical issues, and that pre-orders could solve our financial ones. It was our big chance to get back on our feet.

We gave it everything we had, and we made great progress, but in the end it wasn’t enough. Software had improved, but not enough. Same with hardware and quality control. Pre-orders streamed in, but they too were just not enough. We were right at the finish line, and yet, we were miles away.”

Of course, that status was not reflected in the updates last year.

It is not enough to do your best; you must know what to do, and then do your best.          W. Edwards Deming

Happy New Year 2017

As always, a new round of technology is on display at the Winter CES show in Las Vegas. Given that temperatures are in the teens where I live, warm and sunny Las Vegas sounds rather enticing… However, from my research on the 3D printing space there it is clear that the economic downturn and “cooling” of the market is showing in the types of new offerings. XYZPrinting is there in force with some new selections, but other than the new Markforged desktop metal printer, there isn’t much to be excited about. For one thing, that machine will not be a consumer-priced offering (and as of this writing no price has been announced).

I do have some reviews that have been neglected: the Pixelio scanner table is here, a Mod-T 3D printer, and hopefully by early February a Uniz3D Slash LCD-SLA unit. The Tiko mini delta printer also came just last week, and I’ve managed to get some prints out of it, but nothing great so far. At least I got one! It also looks promising to get the PolyMaker Polysher unit by early February too. I’ve tested a sample of their PVB filament used in that process and had great results – even rough polishing it with IPA in a perfume atomizer. I’ve worked with some Monoprice IIIP units including the MakerSelect and the prints have been fantastic. I’m going to tackle these one by one with some video included too.

And now on to my predictions for 2017 and 3D printing: the consumer space will further consolidate – and educational (read more expensive) offerings will be the norm. I’d like to see a reliable resin printer for under $1000 with decent software (it is possible). And I’d like to see some better 3D scanners. 2017 looks to be the year of IoT, Virtual Reality, and maybe drones… so I rather think that the additive manufacturing space will see less development for now. However, I would not mind being pleasantly surprised!

Fall is here and I’m so way behind on tech reviews!

In case you follow this blog and thought that I’d been abducted by aliens or worse — no I’m still much in the game and there are so many things to catch up on. Such as:

We’ll look at the new MakerBot SmartExtruder+, Tough PLA SmartExtruder, and MakerBot Replicator 5th Gen Plus. That alone is a lot. I have tested the new tough PLA in the heat of battle – 3lb battlebots to be exact – and the three parts made this way held up exceptionally well. More on that to come!

A review of the Mod-t printer is also in the works. And my experiences printing TPU (thermoplastic urethane) have been really fun. Again, some parts made for a recent 3lb battlebot competition held up so well they came out without a scratch.

Liquid resin printers are getting into the mainstream – check out this awesome new offering on Kickstarter: The Morpheus Morpheus 3D This machine is using the concept of an LCD screen and appropriate lighting, such as the ONO unit coming out later (we hope) this month. The ONO 3D printer uses “daylight” curing resin (probably deep blue actually) from the LCD / LED screen of your phone. The promise is of smooth layers and even clear prints if desired.

Scanning is also an area seeing new options. Smartphones have such incredible cameras these days it doesn’t make sense to use some other imaging part. The long-awaited Bevel from Matter and Form seems to be still long awaited… But I did get my Pixelio scan table and can say it works nicely. More on that later too. Check it out here: Pixelio

So stay tuned – by US Thanksgiving holiday I should have at least a few new personal reviews out there.

Solidoodle – end of the road

Tags

, ,

sdoodleripAlthough the signs of impending doom were evident since late last Fall, Solidoodle formally announced end of operations on March 28.  You can read Sam Cervantes’ message to the Solidoodle community here:  http://www.solidoodle.com/blog.html

spress

Solidoodle Press

As I expected, the Press was cited as a major reason for their demise.  You can check my previous blog posts for my experience with an early released unit.  This was a smart looking machine with miserable performance, although with time it did get better – but never close to my Solidoodle2, which continues to run even today (albeit with some needed modifications).

So another 3D printer manufacturer closes its doors.  Sam doesn’t say what he is planning to do now that his company is gone, but I wish him luck in his future endeavors…

2015 – A look back and ahead to 2016

This morning 3D Systems announced “end of life” for their consumer 3D printer, the Cube 3… Cube 3 Discontinued and while parts and supplies will be available for some time, the refocus of 3D Systems into the higher-end educational and industrial applications is a reflection of the narrow profit margins for low-volume per vendor and lots of competition in the consumer space — not to mention that the expected “3D printer in every home” is not even close to reality.

It has been a hard year for consumer-level additive manufacturing in general.  And despite some record funding, additive manufacturing projects on Kickstarter such as Pirate3D have collapsed in a heap.  Solidoodle is rumored to be bankrupt Solidoodle out of money.  Several others also folded (Phoenix3D, MakiBox, supposedly Zeepro, etc.) and of course as mentioned above, 3D Systems has ended their consumer Cube line in favor of refocusing on educational and industrial markets.

This was as I predicted – the wave of startups brought chaos and fragmentation to the consumer marketplace though there are good choices to be had.  A problem remains — 3D printers, no matter what the make, are not just one more “D” in complexity than ink jet/laser paper printers on the desktop.

However, the educational applications are indeed great.  In the “STEM” field, the ability to create and then “print” designs as part of the overall learning experience is an important enhancement.  In a way, this is nothing unexpected – project-based learning has always been at the core of good teaching.  Learning about an electronic circuit is fine but getting the parts and making it actually work is another level of skill. The same applies to mechanical designs and 3D printing – as part of a larger maker space or even as a community resource.

So what is in store for 2016?  The Consumer Electronics Show in early January in Las Vegas will be one indicator.  I predict we’ll see substantive improvements and useful tweaks in consumer offerings, and I’m hoping that liquid systems, though still fussy, will continue to be refined and reduced in cost.  The “plug-and-play” 3D printer is not here yet and may not be soon, but I’m not giving up on the technology!

And one last word – to keep this blog independent and self-sustaining, a small donation to my “caffeine fund” would be appreciated! Just find the “donate button” on the left side of the web page – even $1 will be gratefully acknowledged! 🙂

Amazing new tabletop laser cutter

CO2 laser cutters have been around for a while, but they are either very expensive or just (like low-end imports) not well designed.  A new offering that is probably the most consumer friendly device I’ve seen in this area is called the “Glowforge.”  The basic unit comes with a 40W CO2 laser, continuous autofocus, a 12″ x 20″ bed and internal object recognition cameras that work to identify the materials and alignment.

Check it out here:  glowforge laser

And if you would like a $100 coupon off the purchase check here:  $100 Coupon

This will cover the $99 shipping charge (if you are in the US) so think of it as free shipping!

Early orders go out in December 2015 but I’d guess that later orders will not be fulfilled until mid-2016 (just guessing).

UPDATE: Shipments have been delayed for at least 6 months due to an issue with the power supply – claimed to be a custom component – and that only now (4/16) have the first samples of properly spec’d parts arrived. Refunds are available if you do not want to wait…

Some upcoming reports and a coupon!

First – a shameless promotion… MakerBot is running a coupon special.  If you tap on this link $25 MakerBot Coupon you’ll get a coupon for $25 off your order on a MakerBot machine and supplies.  The details will appear in a new window… Yes, I’ll get a small commission if you use this custom coupon, but any receipts go back into paying for this blog and purchasing machines and materials to test and review.

So while I’ve been quiet for a bit, here are some upcoming reviews that you might find useful:

DaVinci Nobel 1.0 SLA

iBox Nano SLA

Little RP SLA w/tilt option

SeeMeCNC Droplit SLA

And maybe by the end of October, a Peachy Printer…

Spring update

Despite the fact that it is astronomical spring here in the northeast US, still a pile of accumulated snow remains in my front yard.  Hopefully it will not last much longer!

Since early February I’ve been focused at work on a number of extra projects and at my home shop, working on updates to current machines.  So here is a brief summary as to where things are at this stage:

1. MakerBot Mini – working really well, new firmware released recently has made it quieter and the mandatory rafts are now much easier to remove.

2. Cube 3d Generation – with both client and firmware updates and along with some tweaks in the cartridge design have now made this machine very reliable (for me anyway) and builds are working in one or two color mode.

3. Solidoodle Press – soon up for sale.  I’ll be putting it on ebay for $349 plus shipping, maybe less… contact me if you’re interested.

4. Zeepro Zim – the user interface has improved by leaps and bounds.  The machine itself is solidly built and is probably the most quiet hardware out there.  Now that cloud printing and remote control is available, it is one worth considering.  To sweeten the deal, they were having a limited sale at their site http://www.zeepro.com recently.

A new addition to my software resources is Simplify3D.  I’ll be doing a separate review soon, but wanted to mention that it does run a DaVinci 3D 1.0a machine just fine and the results are far better than the free client supplied from xyzprinting with the machine.  In fact, their client software is probably the worst one out there — you’d think a large corporation could manage to create an exemplary user interface to their equipment.  Their new Junior unit is now listed on Amazon for pre-order.