• About Renaissance Engineer

Renaissance Engineer

~ Technology for Engineering Solutions

Renaissance Engineer

Author Archives: Eric Albert

MakerBot Replicator(tm) first impressions

03 Thursday May 2012

Posted by Eric Albert in Uncategorized

≈ 3 Comments

I received one of the first batches of machines sent out into the wild, being delivered in late March.  I’ve run quite a number of jobs with it and am generally very pleased with this new model.  I have the dual extruder version. Here is some early experience feedback from my one month of use.

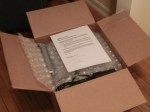
First, the machine came incredibly well packed, with custom cardboard inserts and clever use of materials to cushion the bot.  No damage was found from shipping.  Setting it up was pretty simple, although I found the leveling of the build plate to be fussy (more on that below).  My first test print from the SD card went fine.  As I already had a supply of several color ABS spools, I opted for the “standard” order which comes with two spools of ABS: natural and black.

The good:  it works!  Part build quality is very nice and compares favorably to a uPrint ™ machine from Dimension that costs $15,000 that I have in my lab at work.  In fact, it would be very hard for someone to tell the difference, with the notable exception that the uPrint machine only will accept natural ABS and they do not sell tinted material for it (for that you have to purchase the next model up at $19,000).  MakerBot ABS works out to about 65 cents per cubic inch while the “professional” materials for the uPrint ™ are $4.66 a cubic inch.

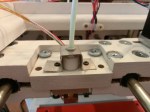
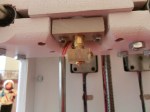
The bad:  well, a few annoying bugs cropped up the first month.  Getting a part to stick to the build surface can be a real problem.  I’ve followed the cleaning and leveling instructions and still have had issues with builds that have long dimensions on the platform.  Raising the build plate temperature to 105C helped.  And the 4 screws used to level the build plate are just barely long enough to do the job and retain some tension on the springs that are meant to keep things tight. One of the thumbscrews fell off during a build from vibration.  I also hear that they have increased the thickness of the aluminum build plate in models shipping now -mine is slightly warped so that the edges bow up from the center which is the lowest point.

The x-axis limit switch is not mechanically fixed to the PCB it is soldered to, so with time it became angled up off the board and didn’t trip at the end of travel when homing the x axis.  A spot of glue puts it in place permanently.

I also ran into a bug when switching from dual to single extrusion.  Moving from a just finished dual extrusion job to a single extruder, the head not being used is still pretty hot.  This seems to fool the software and so the machine actually times out with a head error and shuts down after a bit thinking that the unused extruder should not be hot.  The solution I found was to let the machine cool down completely and then start the single extruder job.  But this certainly slows things down if you are looking to build a number of parts in sequence.

And, a bug in early hardware (mine included) is that you can’t load or remove an SD card when powered up or bad things can happen.  I don’t know what the exact hardware problem is. So far I’ve not encountered it, but do plan on powering it off before exchanging SD cards.

Also, just a small gripe – at this price, you’d think they could provide the machine with a coat of polyurethane on the plywood, but none of the wood surfaces are protected.

Even so, all in all this is light years ahead of the CupCakeCNC machine they started with (and my model still makes parts!) and higher quality than the ThingOMatic.  Now if they would offer a good 3D scanner!

How Time Flies!

08 Thursday Mar 2012

Posted by Eric Albert in Personal 3D Printers

≈ Leave a comment

I finally got a chance to write some things that need posting!  And in looking at my last post, it has been two months of silence at this end… So, here is what is in store for upcoming material:

1. An update showing the final, complete, and yes — working Sumpod.  This includes the Version 2 hot end in place, and some wiring amendments.  The machine is running the Sumpod version of Marlin (thanks to Stohn) and I’m using pronterface to send files to it.  I’ll also include a sort of “wrap up” lessons learned file that completes my build instruction file set.

2. A review of the Solidoodle after numerous hours of printing.  But for a few tuneup adjustments here and there, it has been problem free.  If only there was a heated build platform the prints would be totally awesome (instead, as you might expect with ABS on a cold piece of acrylic, the first few layers are not even).

3. The H-1 (www.seemecnc.com) is awaiting final wiring – using a RAMPS board instead of the electronics supplied with the kit.

4. And, as I’m expecting a Makerbot Replicator(tm) sometime in the next week, there will be an unpacking and first impressions post.  I’ve scoured all of the published documentation including the electronics, and one very interesting feature is that the new MightyBoard electronics package uses digital potentiometers to trim the stepper motor V-Ref lines.

So, stay tuned!

Gallery

The Solidoodles are in the wild!

23 Friday Dec 2011

Posted by Eric Albert in Adventures with a Solidoodle

≈ 6 Comments

This gallery contains 3 photos.

A nice box showed up at my door earlier this week — a long expected Solidoodle.  So here are some …

Continue reading →

Sumpod LCD temperature display fix

14 Wednesday Dec 2011

Posted by Eric Albert in Building the Sumpod

≈ 5 Comments

If you’ve built the electronics and fired up the hot end, you may have noticed that the temperature display gets “weird” after going above 100C and returning to room temperature.  The last zero of “100” gets stuck on the display because the lcd.print() routine is left justified.  Here is a simple fix.  Just go into the arduino editor for the Sumpod firmware, and find the first line commented below.  Change the code after it as follows (the red text is what is new):

// display temp

lcd.setCursor(11,1);

int valsum=analog2temp(current_raw);

if (valsum<100)

{lcd.print(” “); lcd.print(valsum);}

else {lcd.print(valsum);}

}

Recompile and upload to the arduino board and your LCD temperature display will now work correctly.

An experimental hot end for the Sumpod

14 Wednesday Dec 2011

Posted by Eric Albert in Building the Sumpod

≈ Leave a comment

While I know there is a new OEM hot end on the way, I went ahead and created my own experimental one.  And, it really works!  To save time, I purchased a “universal” one offered on ebay (http://www.ebay.com/itm/110781340223) and modified it to work in the Sumpod head.


Does it work?  Yes, indeed it does.  Now, on to a real build!

First Extrusion

First Extrusion

A roundup of new personal 3D printers

06 Tuesday Dec 2011

Posted by Eric Albert in Personal 3D Printers

≈ 2 Comments

Three new personal 3D printers, all fused filament types, are being offered in the US.  At the moment, two are on crowd-source funding campaigns, and one is being offered directly through a storefront.  These are complete units, in one case fully assembled and tested, with the intended market being new people to the field.   Prices are quoted as listed today and may be subject to change.

The cheapest, the SeeMeCNC H-1, is being offered on indiegogo.com at $350 complete but has a parallel port controller board.  Their campaign ends in 4 days from now. These guys are from the CNC subtractive manufacturing world.  The unit has injection molded parts and even injection molded plastic bearings!  It is patterened off of the RepRap Huxley design. You can order the unit without the electronics and motors for just $100 and add your own with a RAMPS or even one of the MakerBot controllers.  Hmmm, maybe it is time to retire my old CupCake CNC and reuse the electronics??  There doesn’t appear to be a heated build surface for this one yet.

The next one up the price list is from kickstarter.com as well as their own web site, printrbot.com.  It is $499 complete, and this includes an integrated hot build surface.  Again, it is intended for a novice to assemble.  This unit has sold over 900 units for a take of $320,000, with still 11 days to go.  It is quite compact and also claims to be expandable by changing out rods and screws.  Quite amazing!

The last unit to mention is from solidoodle.com.   This unit is $699, but unlike the other two, it is completely assembled and tested upon arrival!  Another unique feature is that it is completely enclosed with a hinged front see through door.  This definitely looks more like a “real” appliance, and the enclosed design is far safer in public settings.  I’ve been tentatively recommending these to school districts (since I’ve not seen one in action yet).  Shipments are scheduled by mid-December at this time so some lucky folks will soon have the opportunity to check them out.

None of these machines are “in the wild” yet though will be in the next few months.  It looks like 2012 will be an exciting year in the development of personal 3D printing!

Sumpod Wiring Instructions – Part 1

01 Thursday Dec 2011

Posted by Eric Albert in Building the Sumpod

≈ 9 Comments

I decided to break the wiring information into two pieces.  There are too many minor loose ends I’m working on but have not had time to address. My “day job” gets intense this time of year (final exams, tests, grading, etc.) so the “spare time” is far less so.  At the end of this part, there is a pictorial diagram for wiring the LCD.  Seems to be a lot of confusion out there, so if you are having trouble on this, check out what I have posted: SumpodBuildPart4a

Sumpod – finding the LCD problem

28 Monday Nov 2011

Posted by Eric Albert in Building the Sumpod

≈ 2 Comments

Well, building things like a Sumpod can be loads of fun!  You may have noticed that the LCD was working in the last post, which it was… and the problem?  Well, I did wire it all quite correctly, but after getting nothing but a line of fully filled in blocks, I decided to go deeper.  Now understand that everything else was working fine — all 4 motors and the control for the extruder heater responded perfectly.

The problem, as it turned out, was that two of the auxilliary digital lines used for the LCD were not actually connected to the corresponding pins on the arduino board!  The RAMPS board had two lines where running continuity checks proved out that those connections were open!  The traces are on the edge of the board and the connector are short, but the copper between them was open.  I easily fixed this with some #30 wirewrap wire to directly connect the output pin to the corresponding pin going to the arduino.  If you look very closely at the picture, you will see the wires from the second and fifth pins going from the dual row header to the edge connector. I’ve built many hundreds of printed circuit boards in all sorts of projects, and this does sometimes happen to multilayer boards.

Of course, for me this was just the “luck of the draw” in as much as there is no way, short of building the board, to discover this, unless the board manufacturer did a full circuit test.  Once patched, the LCD works everytime!

Sumpod – tweaking it a bit…

24 Thursday Nov 2011

Posted by Eric Albert in Building the Sumpod

≈ 3 Comments

I’m still working on those final wiring instructions — seems I find yet another detail to mention that I feel should be helpful.  As it is Thanksgiving holiday here in the US, I’m taking a break from work and building things.

Here is a picture of the complete unit, LCD glowing, and fan running — just waiting for something to build!   However, I’m still fussing with the extruder a bit but more on that later.  I’m also working on the XML file for ReplicatorG so it will have a specific profile to interface it to the Sumpod.  Sure, Pronterface and Repsnapper are OK and I’ve used them, but it would be nice to have one common software interface for the units I work with (ThingOMatic, CupcakeCNC, classic Mendel, and now Sumpod).

It works!

21 Monday Nov 2011

Posted by Eric Albert in Building the Sumpod

≈ 2 Comments

A quick update – as of now, it works but for a problem with the LCD display… and despite checking wiring, etc., (BTW I’ve done loads of these…) it still is not working.  Even tried a different 16×2 display of my own stock.  But the good news is that I have the heater working, extruded some plastic, and all 3 axes are running smoothly!  So it should not be long before the first build, and obviously the LCD has no bearing on getting out a print.

I already am looking at added a heated bed by routing out a piece of MDF to support a MakerBot ThingOMatic unit.  I have all of the MakerBot parts ready to go.  However, another power supply will be needed to manage the heated bed current consumption.  Thus this will be something for later.

Like some others’ experiences, if the fan is running the extruder temperature doesn’t get beyond 160C but as soon as you turn it off, it quickly goes to 200C and stays there, even with plastic being extruded.  I have a “first generation” extruder design. I do have some ceramic tape insulation that I think I will try before I go to something where the fan is controlled by the RAMPS board in some fashion.

For those of you waiting for the last build instructions, please be patient!  In testing I found some issues and so as I have said before, I do not want to release a set of instructions followed by a long list of “oops” and exceptions.

← Older posts
Newer posts →

Help me keep going in 2023!

Donate Button

Recent Posts

  • A story of “shock induced” instant repair
  • The Right to Repair depends on Parts and Information
  • And don’t forget the tiny picosatellites!
  • Don’t burst my balloon!
  • Formlabs $500 discount referral link

Archives

  • August 2024
  • September 2023
  • March 2023
  • February 2023
  • June 2022
  • February 2022
  • January 2022
  • June 2021
  • May 2020
  • January 2020
  • January 2019
  • July 2017
  • April 2017
  • January 2017
  • October 2016
  • March 2016
  • December 2015
  • October 2015
  • September 2015
  • April 2015
  • January 2015
  • December 2014
  • November 2014
  • October 2014
  • September 2014
  • June 2014
  • April 2014
  • March 2014
  • September 2013
  • June 2013
  • February 2013
  • September 2012
  • July 2012
  • June 2012
  • May 2012
  • March 2012
  • December 2011
  • November 2011

Categories

  • Adventures with a Solidoodle
  • Building the Sumpod
  • General Technology
  • Personal 3D Printers
  • Uncategorized

Meta

  • Create account
  • Log in
  • Entries feed
  • Comments feed
  • WordPress.com

Blog at WordPress.com.

  • Subscribe Subscribed
    • Renaissance Engineer
    • Already have a WordPress.com account? Log in now.
    • Renaissance Engineer
    • Subscribe Subscribed
    • Sign up
    • Log in
    • Report this content
    • View site in Reader
    • Manage subscriptions
    • Collapse this bar
 

Loading Comments...
 

You must be logged in to post a comment.