• About Renaissance Engineer

Renaissance Engineer

~ Additive Manufacturing and Technology

Renaissance Engineer

Category Archives: Personal 3D Printers

Another Round of 3D printers

04 Wednesday Jun 2014

Posted by Eric Albert in Personal 3D Printers

≈ Comments Off on Another Round of 3D printers

As summer approaches here in the US, two machines that were announced at the Winter CES event are now available.  The MakerBot Mini began shipping two weeks ago, and 3D Systems’ Cube 3 was set for late June deliveries with preorders now.  The third generation Cube claims a layer resolution of 75 microns (.003″) and prints in ABS or PLA in two materials / colors at once.   The exciting thing about this machine is the new filament delivery system, with nozzles attached to the print cartridges.  The price of the cartridges is the same as the previous Cube 2 model, but it isn’t clear if they contain the same amount of filament as before.  WiFi remote is still included but now there will be an iOS and Android control app too.Cube 3D printer

I plan on posting my personal experiences with both of these machines in early July.  The Mini uses PLA only, but you can source your own filament.  The Cube requires proprietary cartridges, but the cartridges come in PLA or ABS with more color choices.  A departure from the previous generation Cubes is that this unit changes to a Bowden-style remote extruder motor that drives the filament using an internal mechanism in the center of the new cartridge.

However, the next wave of personal 3D printers will be those using liquid photopolymers.  And again, capabilities are expanding while prices are going down.  A commercial SLA machine I know currently costs $10,000.  The build envelope is 4 x 3 x 4″.  It does not have WiFi or an internal buffer, thus it has to be in communication with a computer at all times while printing through a USB connection.  But this week, XYZ Printing announced the Nobel 1.0, to be sold for under $2500 at the end of 2014.  Here is a quote from their press release:

“Using stereolithography technology, also known as optical fabrication or photo-solidification, the print resolution of Nobel 1.0 reaches 25 microns. By improving the resin-filling mechanism, Nobel 1.0 provides a stable SLA printing quality so that users do not need to add liquid resin constantly throughout the printing process. Slightly larger
than other desktop SLA printers, the build size of Nobel 1.0 is 5 by 5 by 7.9 inches. It is expected to hit the market in 2014 Q4 at the price level of $2500 or less, making Nobel 1.0 the most affordable desktop SLA 3D printer on the market. Targeting users that are more concerned in printing quality, Nobel 1.0 works perfectly for jewelry designers, dentists, and industries that require rapid molding processes.”
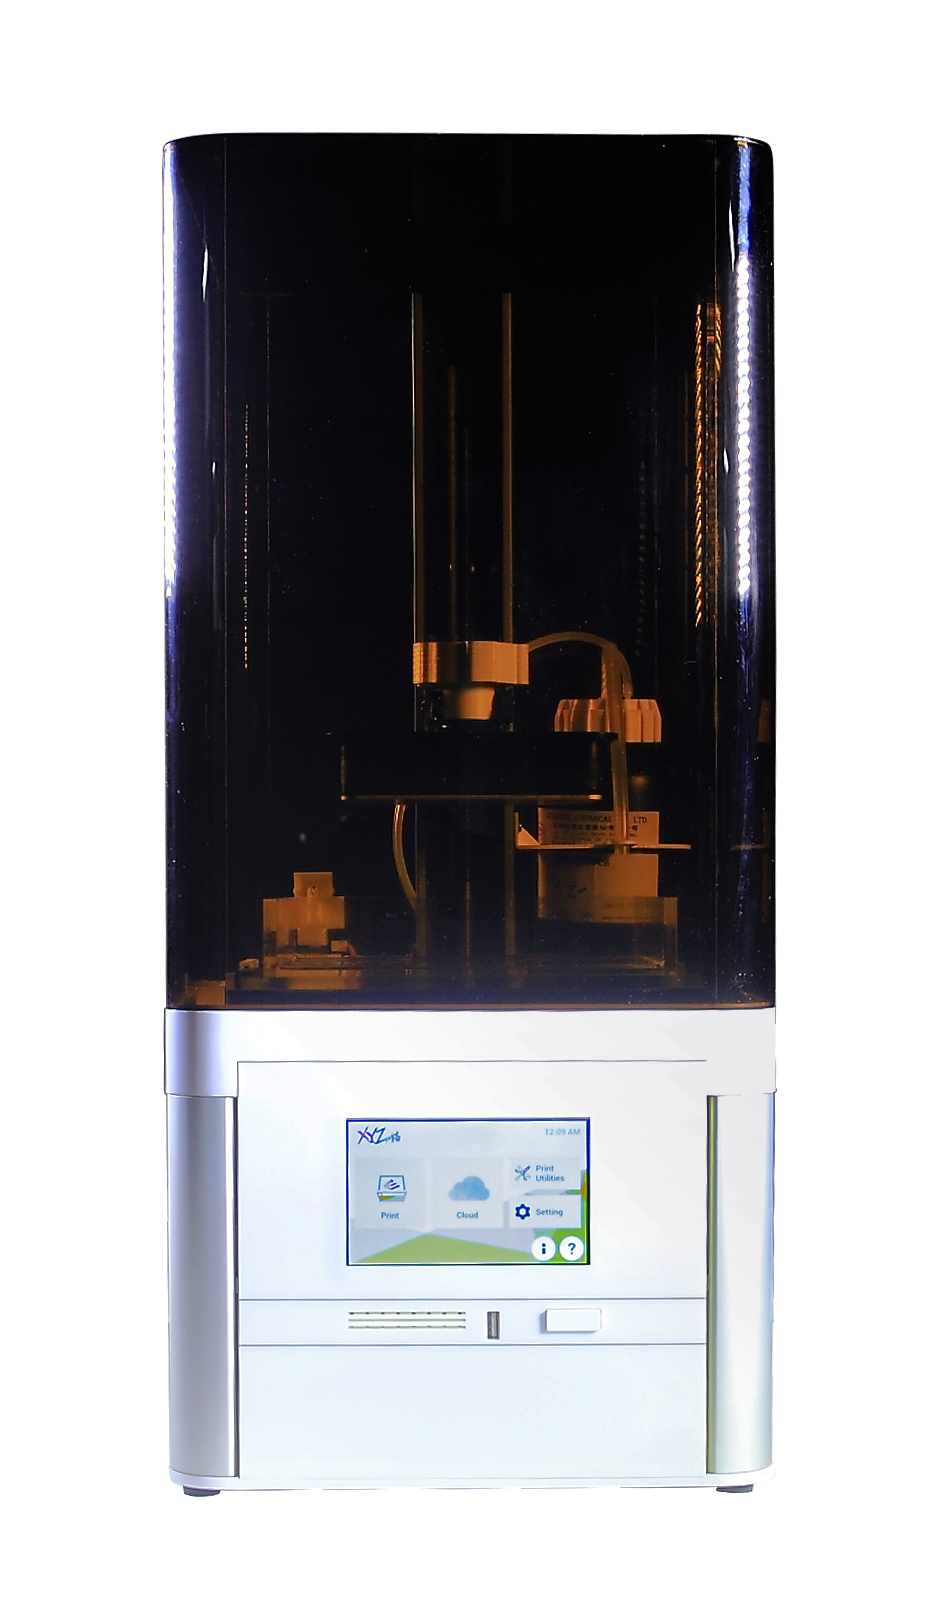
 Nobel 1.0 SLA

Nobel 1.0 SL

While this technology is amazing for smaller, precision parts (like the applications mentioned above) there are downsides.  The photopolymer liquid is hazardous before it is cured, and skin contact is to be avoided at all costs.  The materials have shelf lives of perhaps a year.  Unused material must be disposed of properly – I have resorted to small disposable trays put out on a sunny day to cure.  Models must be cleaned with isopropyl alcohol to remove any remaining liquid, and depending on several factors, might need additional curing with UV light.  Also, this material is eventually degraded by exposure to sunlight, and generally has lower strength and heat deflection temperatures than ABS or PLA.  Supports are made of the same photopolymer, and thus are “breakaway” needing cleanup and removal.

I’ve amazed some of my students by taking a small cup of photopolymer and “drawing” in it with a blu-ray laser pointer.  I pour away the remaining liquid, leaving a “solid doodle” that recorded the light’s movement in the cup.  Yes, this stuff cures that fast.  In fact, heat is generated during the curing process, making for a small risk of fire if you get a large quantity in contact with some catalytic agent – so my advice is never use metal objects with these materials while liquid.

First Impressions – the DaVinci 1.0 3D printer

04 Friday Apr 2014

Posted by Eric Albert in Personal 3D Printers

≈ Comments Off on First Impressions – the DaVinci 1.0 3D printer

Tags

DaVinci 1.0

DaVinci 1.0It arrived just last Friday and is now sitting in my lab space – where it has made a number of successful models.  At the price it is quite amazing!  It worked right out of the box.  So here are some pros and cons based on my limited exposure to using it:

Pros: Software is easy to install, firmware updates happen quickly with no reset buttons needing pressed.  8 x 8 x 8″ glass build platform is heated, and has self-leveling software too.  At some out of tolerance condition, the user is guided to adjust the bed thumbscrews, but the unit is well marked to warn you not to adjust the bed from the initial factory settings unless prompted.  Unit is fully enclosed – top door is sensed when open but the front door is not. Well lit inside for viewing.  There is a 4-line LCD and 6 button interface with a home button. The extruder has a park position with a nose wiper and “spit” bucket for excess filament. Loading filament is easy but you do have to push a bit at first to insure the pinch roller catches it.  The machine goes into an idle standby condition after several minutes, and this time can be set in the menu.  The machine is pretty quiet – far quieter than my 1st generation Cube.   And it appears that the machine will store the current job and does not need to remain connected to the computer.

Cons: The software has a spartan look about it, but all the essential features are there. Slicing is slow, but there are a lot more options than the 3D Systems Cube client.  Four different layer thicknesses can be chosen, and the 100 micron setting does really work.  Setting profiles can be named and saved for later recall.  Currently only ABS can be used, but supposedly PLA is on the way.  Proprietary 600g cartridges are used, but at the current price, they are very competitive and even cheaper than some brands of open reel filament. The machine appears to be a bit slower than the Cube 3d unit, but works smoothly. So is it worth $500?  Definitely – this would make a great addition to a school classroom and clearly would work well for someone with little or no experience in 3D printing.

I’ll update this post with more details as we get more time with the machine.

UPDATE: After two weeks of use, this machine is doing just fine.  There have been some incremental updates to the driver software such that things like infill are now more explained.  The latest firmware (1.1.I as of this writing) adds several useful menu items, such as moving the head to enable easy access to the drip box for cleaning it out.  The only weird thing is that it insists on purging the head above the build platform at the beginning of a job, requiring a manual removal of that stray filament – or it will be dragged into the build.  Why this is happening (when it is so easy to fix) is beyond me.  Why not do that at the drip box???  But once a job has started, I feel confident to leave it to completion.  And if you are patient, the builds easily pop of the glass plate once cooled down – no need for a scraper. Given that there have been a number of early improvements to both driver and firmware, I suspect both will continue to improve the machine’s capabilities with time.

Of course, there is some debate about the chipped cartridges.  Yes, there have been hacks posted… but probably the biggest issue at the moment is just the availability of the cartridges in the retail market.  At $28 for 600g of ABS, that translates to $46 for 1 kg, and although you can get ABS filament for perhaps $30 a kg, I’ve not been all that happy with my samples of the cheaper brands.  At $48/kg, Makerbot filament has been consistently good (at least in my machines) but obviously without hacking the EEPROM you can’t refill an empty unit.

How do the builds compare to other machines?  With careful choice of parameters, I’ve produced models almost as good as a $15,000 uPrint machine.  And, the DaVinci has a bigger build volume though it is a little slower.  It definitely beats my Solidoodle 2, but my Cube 2 can make better quality sidewalls.  This may be a belt tension issue so I’m going to investigate that soon.

By mid-summer the 2.0 dual nozzle unit should be on sale in the US (it is currently on preorder in Taiwan, and they will not ship outside that area).  The WiFi enabled, Android touch panel version comes out after that.  I suspect that this model is causing heartburn in more that a few places that were selling more hobbyist-style models. There is certainly a place for those – but not for someone who has limited interest in sweat equity technology.

UPDATE 2: Yes, the sidewall problems were indeed a loose X belt which was simply fixed with a procedure that is now shown on the support page for the printer.  And with that, the prints have been really consistent.  The purge behavior is still the same, even though I’m now on the “J” firmware version and several client software versions later.  The fix?  I put a piece of 2 mil Kapton tape on the right edge  of the build platform where it purges and that solved it.

The New Crop

11 Tuesday Mar 2014

Posted by Eric Albert in Personal 3D Printers

≈ Comments Off on The New Crop

The Winter Consumer Electronics Show in Las Vegas is for technically-minded folks something like a theme park for kids.  Having experienced one some years ago, it is about the only reason I’d make a visit to Las Vegas – they can keep the gambling casinos!

If the current show was any indication, 3D printing and scanning is certainly getting more and more attention.  Despite what manufacturers think we want and the prices they hope we will pay, the marketplace will eventually sort it all out.  In the technical goods world, the model over time is clear: as the technology becomes more adopted, features expand, prices shrink.  As we are still in the early days of consumer 3D printing, this trend is just starting to show up, and I believe there will be some clear winners and losers over the next few years.

As someone who always shops for the most bang for the buck, I’ve formed some opinions on the new crop of 3D FFF (fused filament fabrication) printers.  What becomes clear is that some models are way overpriced for their capabilities.  However, one difficult to measure parameter is the true value of the “ecosystem” that the manufacturer provides. Few provide data on noise levels or expected life of extruders, heaters, etc.  My source of information comes from what the manufacturer has published and not from real life tests – as of this writing, most of these machines have been announced but not sold.  However, my long experience in this area gives me some confidence that I am close to reality.

So what machines, as of early March 2014 are on the horizon?  The 5th generation Makerbots have started to ship this week.  Cubify 3d generation machines are still not open for orders.  I have heard early April may be the time.  The DaVinci 1.0 machine, which takes the prize currently on low price and competitive specifications ($499) does used chipped cartridges like the Cube 3D unit.  At $28/600g of filament that is better than the other currently chipped consumer model.  After more than a year in the making, the Makibot A6 at $300 as a kit is now shipping [mine is currently in transit as of late March].  And don’t forget Kickstarter projects Zeepro Zim, CEL Robox, and EZ3D Phoenix are soon to launch into the consumer space!

Also, the emergence of low-cost 3D scanners is upon us this spring, with the Makerbot digitizer, the Matterform unit, and the Rubicon 3D.

Rather than give you my own impressions, here are the links to the product pages for the above.  Happy researching!  I suggest you compare things like build volume and price, material choices, the “ecosystem” offered [client software, etc.] and any warranty after the sale.  I have my favorites, but that might change as I test them – more to come!

Fused Filament Machines (fully assembled)

MakerBot:   www.makerbot.com

Cube3D:     www.cubify.com

DaVinci:      us.xyzprinting.com

Zeepro Zim:   www.zeepro.com

CEL Robox:  www.cel-robotics.com

Kits:

Phoenix3D:   www.phoenix3dprinter.com

Makibox:   www.makibox.com [as of summer 2014, Makibox is bankrupt and did not deliver all orders]

Scanners:

Matterform:   www.matterform.net

Rubicon: www.rubicon3d.com

Makerbot:   www.makerbot.com/digitizer

Note that all three of these scanners use laser lines and a camera to measure the object and create a point cloud.  Where things get interesting is in the client software, so while the hardware is fairly easy, the data processing part is not.

Cube 3D Printer Review

16 Monday Sep 2013

Posted by Eric Albert in Personal 3D Printers

≈ Comments Off on Cube 3D Printer Review

I’ve owned a first-generation Cube 3D printer

for almost a year (I ordered it in April 2012, but it was not delivered until a few months later).  I’ve printed a lot of parts with it and most were successful.  So if you are considering this machine, let me summarize the good and bad.  BTW the second generation machine is almost identical but for the build plate and material selection, but more on that later.  Both first and second generation machines offer only a single nozzle, but the client software does provide for rafts and supports.

First the good:

If you are a novice to 3D printing looking for a 3D printer that is more of an appliance than others, then this is a reasonable choice.  Think of this as a 3D printer with a 2D printer business model – most everything is proprietary and you really only have one source of supply – 3D Systems who sells it.  You can’t use your own filament (the cartridges are chipped to prevent this like ink cartridges in a 2D printer), the software to run it is proprietary (free and updated now and then, but still fairly “bare bones” at that), the Cube glue for adding adhesion is theirs, etc., etc.  In fact, the options are so limited in the driver software (both Windows and Mac versions) it severely limits making engineering strength parts (the second generation Cube will do “solid” fill parts though).

If you are looking for a very controlled experience, then here it is.  As for materials, they do offer a range of colors and two materials:  ABS and PLA.  However, PLA is only usable in the second generation machine, but people have hacked the first gens to work with this. And you are effectively paying $49 for .75 pounds of ABS (or PLA) which amounts to $65 a pound, when good quality ABS filament can be had for $16-18/lb. in the open market.  The ecosystem is well integrated into a special Cube web site, so much so that you have to “activate” your printer online before you can use it!

The web site has plenty of supporting materials:  latest driver software download, manuals,  guides, etc.  The supplies and some replacement parts are easily purchased there.  Customer support (when I needed it on a few occasions) was fairly fast and responsive.

The machine is quite compact and hidden inside it are some good mechanical components.  The axes are linear dovetail sliders with plastic bearing interfaces.  The Z and X axes are mounted to a rigid sheet metal frame while the Y axis is on a separate gantry that moves the platform.  The aluminum build platform is heated and can be easily removed – it is magnetically attached with locating pins.  There is an optical encoder on the extruder pinch wheel, and the processor is a fairly capable PIC32MX440.  There is a 2Gb mini SD card buried inside on the controller board, probably buffering space for job files. There are two USB ports, one only for updates the other for a USB thumb drive. WiFi is built in and can be configured in ad-hoc or networked mode. The touch screen interface, while small, is still easy to navigate.  The power supply is a “floor brick” like a laptop, but much bigger.

The Bad:

The first thing you will notice is this:  the first generation machine is downright noisy!  I tried to use it in a demo during a virtual statewide teacher’s conference and even putting it in the back of the room was too much for the participants to bear at the remote facilities – the noise got picked up by the microphone and drowned out the speaker.  Now, it isn’t so bad in a room but you will notice it.  I’ve heard the official second generation machine is quieter, but I have no idea if it is really “quiet.” Slicing a model in the driver software is pretty fast, but there are no choices of layer height.  And you can use .STL files (thankfully!) from anywhere, but they also distribute models in an internal format that can’t be changed or used elsewhere but on the Cube machine.  And in my opinion, the closed system with software and supplies is only an advantage if you are looking for an appliance that serves your needs in 3D printing and you want to put in the least “sweat equity” to get models made.

As for the second generation machines, the aluminum build plate was changed to a glass plate, and the heater for the build plate was removed.  Support for PLA as well as ABS material was added, and the second generation setting in the client software unlocks some new options for model fills.  But from all I can see, the basic machine is the same.  The price as of writing this was still $1299, but with other competition on the horizon, I don’t see how this will remain at that level for much longer.

New Reviews Coming Soon

17 Monday Jun 2013

Posted by Eric Albert in Personal 3D Printers

≈ Comments Off on New Reviews Coming Soon

Looks like early July for some new reviews on 3D printers, most specifically the Revolution  from QU-BD.COM, the PiMaker and the 3D Systems Cube.  The Revolution should be delivered to me before the end of June, the PiMaker kit is being delivered shortly, and I’ve had the 3D Systems Cube for 9 months (but no time to really go into a full article on it).

Revolution 3D Printer (6x5.5x5.5 Build Area)QU-BD  Revolution

UPDATE:  OK, July came and went, and like the promises of a lot of crowd funded projects, they don’t get fulfilled.  So as of early September, I’m still waiting on my QU-BD Revolution machine, despite being one of the first 10 in January of this year to order one.  Soon, so I’m told…yet other orders have gone out that were placed after mine was, and nobody there seems willing to commit to a ship date and my emails are ignored.  Not a good way to build a business for the long term where there is a lot of competition and more buyers expecting the vendor to be responsive to customer needs (Update: RXL received in late October and I will get something out soon on this unit).

pimaker-3d-printer-1

As for the PiMaker, I did receive that in late July and got the main chassis work done, despite having very limited documentation at the time (almost none, really).  So, I decided to give it a few months to sort out the details, and that has proven to be useful.  And, somehow I totally forgot that I ordered a makibox (www.makibox.com) kit back in April (that was a busy month) and that is expected late September or early October (Update:  shipping started in December 2013 but mine is still in the queue).  Then, slated for February 2014 is the Buccaneer 3D printer from Kickstarter (Update: this has been delayed to April 2014).

I did get my linear bearing and aluminum platform updates installed in the Solidoodle 2d generation unit, and that made a world of difference.  It is so quiet and smooth that it is hard to believe it is the same unit.

So once the backlog of reviews gets posted, you’ll have a lot to read and comment on.  I promise! 🙂

Solidoodle V2 – First Successful Print

03 Monday Sep 2012

Posted by Eric Albert in Personal 3D Printers

≈ 7 Comments

Tags

3d printer, solidoodle

Solidoodle V2 first successful printAfter a long summer hiatus, I’m finally back working on the Solidoodle V2.  Suffice to say it wasn’t ready to print right out of the box.  Several issues were apparent – the bed was not level nor at the right gap from the tip, and there was a gouge out of the Kapton tape cover on the heated bed.  Then I was bamboozled by an undocumented change to how the unit would get to the home position in addition to the reported temperature settings being 20C off of reality.  These are all things one might not expect, but then again, getting an early unit from the start of production you have to be willing to work out some bugs.

After two firmware updates, bed leveling, replacing the Kapton sheet, and working on Skeinforge settings, I have my first successful print.

First Impressions

On the hardware side, the V2 is much better than the V1.  The metal frame is well made, with crisp corners and solid construction.  Actual threaded inserts are used instead of sheet metal screws into thin steel sheet.  On the minus side, the electronics sit on the back side of the case with exposed wiring, and while this is low voltage, in the V1 the controller board was nicely isolated inside the case.  I ordered mine with a heated bed which honestly could use a higher wattage heating element — it is slow to get to temperature, unlike the extruder.

Temperature Problems

OK basically if you set the temp of the extruder with Pronterface to 200C what you get at the tip is 218 – 220C!  This is  not good.  Would somebody please save me the trouble of doing a thermistor calibration table for the firmware?  If I set the extruder to 210C or whatever in the gcode file or from Pronterface, it should be 210C at the tip!  (consider this a mild rant).

Parts not Sticking to the Build Platform

A huge issue.  I spent a lot of time leveling, gap setting, and cleaning the Kapton.  The build platform should be around 100C but mine never gets there.  85C is about all it can do, and then it has the issue of being wrong anyway with the thermistor calibration.  I’ve not taken the time to measure the actual temperatures, but I did find an absolutely bullet-proof solution (pun intended).  The 3D Systems Cube printer comes with “magic glue” to coat the aluminum build plate (there is no Kapton on it) and it washes off when done.  Without a doubt this is some sort of PVA water-based glue [update:  no, it is rather something like “Mucilage” of days gone by…]  It is thick with a slightly amber color.  It washes away with warm water in an instant, so it cleans off both the platform and part without a trace.  Putting a thin layer on the Kapton surface, my prints have stuck with incredible success and are fairly easy to remove and clean!

Improvements

After hours of getting this to work for the first print, I’ll have to admit that at times I was ready to pack it up and send it back or unload it on ebay.  I’m no stranger to these machines (as this blog should prove) but the lack of updated and machine-specific documentation, a serious temperature calibration issue (which could lead to hot-end meltdown), and some other quirks have proven to be frustrating.  And, the first prints are still showing oozing and other issues that mean the Skeinforge profile needs tweaked.  I’d like to see the electronics better protected.  Some of the wiring cables appear to be too short and I’m worried that with more use they will break from fatigue.

I’m a big fan of competition in these sorts of things, and at the price it is a reasonable value if only the unit would live up to the results I got in the V1 right out of the box.  BTW an excellent new blog on the V2 just went live in late August, so check out Ian Johnson’s Solidoodletips for lots of helpful material if you are looking to get your V2 set up.

Did I mention the Cube(tm) 3D printer?  Yes, mine is working as I write this.  A review will come next.  How are the prints?  Incredible right out of the box! 🙂

UPDATE:  After trying to make a known size calibration cube, it became painfully obvious that something was wrong.  The X and Y dimensions were well within specifications, but the Z was crunched by about 15%.  I thought of all sorts of things, including the firmware calibration factor for the Z screw but that was not the problem.  The Z axis motor driver was way too hot and the idle voltage was well over the .500 V the troubleshooting page suggests.  This is how it came from the factory, so I made sure all of the stepper driver boards were adjusted to the  suggested values, or slightly less, and now things are fully functional.  I’ll put up some prints of parts soon.  One change from the V1 to V2 for the Z axis is that the V2 uses a 5/16 threaded rod and the V1 used a 1/4″ Acme screw (which is far more precise).  But, such is the need for cost savings.

How Time Flies!

08 Thursday Mar 2012

Posted by Eric Albert in Personal 3D Printers

≈ Comments Off on How Time Flies!

I finally got a chance to write some things that need posting!  And in looking at my last post, it has been two months of silence at this end… So, here is what is in store for upcoming material:

1. An update showing the final, complete, and yes — working Sumpod.  This includes the Version 2 hot end in place, and some wiring amendments.  The machine is running the Sumpod version of Marlin (thanks to Stohn) and I’m using pronterface to send files to it.  I’ll also include a sort of “wrap up” lessons learned file that completes my build instruction file set.

2. A review of the Solidoodle after numerous hours of printing.  But for a few tuneup adjustments here and there, it has been problem free.  If only there was a heated build platform the prints would be totally awesome (instead, as you might expect with ABS on a cold piece of acrylic, the first few layers are not even).

3. The H-1 (www.seemecnc.com) is awaiting final wiring – using a RAMPS board instead of the electronics supplied with the kit.

4. And, as I’m expecting a Makerbot Replicator(tm) sometime in the next week, there will be an unpacking and first impressions post.  I’ve scoured all of the published documentation including the electronics, and one very interesting feature is that the new MightyBoard electronics package uses digital potentiometers to trim the stepper motor V-Ref lines.

So, stay tuned!

A roundup of new personal 3D printers

06 Tuesday Dec 2011

Posted by Eric Albert in Personal 3D Printers

≈ 2 Comments

Three new personal 3D printers, all fused filament types, are being offered in the US.  At the moment, two are on crowd-source funding campaigns, and one is being offered directly through a storefront.  These are complete units, in one case fully assembled and tested, with the intended market being new people to the field.   Prices are quoted as listed today and may be subject to change.

The cheapest, the SeeMeCNC H-1, is being offered on indiegogo.com at $350 complete but has a parallel port controller board.  Their campaign ends in 4 days from now. These guys are from the CNC subtractive manufacturing world.  The unit has injection molded parts and even injection molded plastic bearings!  It is patterened off of the RepRap Huxley design. You can order the unit without the electronics and motors for just $100 and add your own with a RAMPS or even one of the MakerBot controllers.  Hmmm, maybe it is time to retire my old CupCake CNC and reuse the electronics??  There doesn’t appear to be a heated build surface for this one yet.

The next one up the price list is from kickstarter.com as well as their own web site, printrbot.com.  It is $499 complete, and this includes an integrated hot build surface.  Again, it is intended for a novice to assemble.  This unit has sold over 900 units for a take of $320,000, with still 11 days to go.  It is quite compact and also claims to be expandable by changing out rods and screws.  Quite amazing!

The last unit to mention is from solidoodle.com.   This unit is $699, but unlike the other two, it is completely assembled and tested upon arrival!  Another unique feature is that it is completely enclosed with a hinged front see through door.  This definitely looks more like a “real” appliance, and the enclosed design is far safer in public settings.  I’ve been tentatively recommending these to school districts (since I’ve not seen one in action yet).  Shipments are scheduled by mid-December at this time so some lucky folks will soon have the opportunity to check them out.

None of these machines are “in the wild” yet though will be in the next few months.  It looks like 2012 will be an exciting year in the development of personal 3D printing!

Newer posts →

Help me keep going in 2021!

Donate Button

Recent Posts

  • $500 Coupon for Formlabs
  • COVID-19 and Additive Manufacturing
  • OK, one year later…
  • What will 2019 Bring?
  • Robo R2 – the big brother to the C2

Archives

  • December 2020
  • May 2020
  • January 2020
  • January 2019
  • July 2017
  • April 2017
  • January 2017
  • October 2016
  • March 2016
  • December 2015
  • October 2015
  • September 2015
  • April 2015
  • January 2015
  • December 2014
  • November 2014
  • October 2014
  • September 2014
  • June 2014
  • April 2014
  • March 2014
  • September 2013
  • June 2013
  • February 2013
  • September 2012
  • July 2012
  • June 2012
  • May 2012
  • March 2012
  • December 2011
  • November 2011

Categories

  • Adventures with a Solidoodle
  • Building the Sumpod
  • Personal 3D Printers
  • Uncategorized

Meta

  • Register
  • Log in
  • Entries feed
  • Comments feed
  • WordPress.com

Blog at WordPress.com.

Cancel

 
Loading Comments...
Comment
    ×